iOS — Overview
SightHub for iOS
SightHub for iOS is the companion app for optical retail teams: tasks, the
appointment book, the team schedule, daily and sales reports, and inventory
counting by scanning frame tags with the camera.
It is on the App Store as SightHub, requires iOS 15 or later, and runs on
iPhone and iPad. The interface is dark-themed on every device.
The app has no accounts of its own. It talks only to your company's own SightHub
installation, so the first thing it asks for is the address of that installation
— see the next section, everything else depends on it.
Each section below is one screen, with the actions you can take on it.
iOS — Connect to your company workspace
This is the very first screen after installing, and it is the one people get
stuck on. The app is not a single shared service: every SightHub company has its
own workspace, reachable at its own subdomain, and the app must be pointed at
yours before a username or password means anything.
The screen shows the SightHub mark, the heading Connect to your company
workspace, one field labelled Workspace address, the hint
e.g. your-company.sighthub.cloud, and a Continue button.
What to type
Your workspace address is the same address you use to open SightHub in a browser
on the shop computer. If you do not know it, ask your manager or store owner —
support cannot guess it for you.
Three forms are accepted:
| You type | The app uses |
|---|---|
acme |
https://acme.sighthub.cloud |
acme.sighthub.cloud |
https://acme.sighthub.cloud |
optical.example.com |
https://optical.example.com |
The rule behind the table: if what you typed contains a dot, it is treated as a
complete address and used as-is. If it contains no dot, the app appends
.sighthub.cloud to it. So the company shorthand alone is enough for a
standard workspace, and companies on their own domain type the whole host.
A few details worth knowing:
- The connection is always HTTPS. Typing
http://does not downgrade it —
the app rewrites the address tohttps://either way. - Capitals and stray spaces are cleaned up, so
ACMEandacmeare the same. - A non-standard port is kept if you include one (
acme.sighthub.cloud:8443). - Anything that cannot be read as an address is rejected on the spot with
Enter a valid SightHub workspace, and you stay on this screen.
After Continue
The address is saved on the device and you go straight to the sign-in screen. You
will not see this screen again on this device — the workspace is remembered
between launches and after signing out.
A wrong-but-valid address is not caught here. It is caught one screen later, when
signing in fails. To correct it, use Switch company on the sign-in screen or
in Profile → Account, which clears the saved workspace and brings this screen
back.
iOS — Sign in
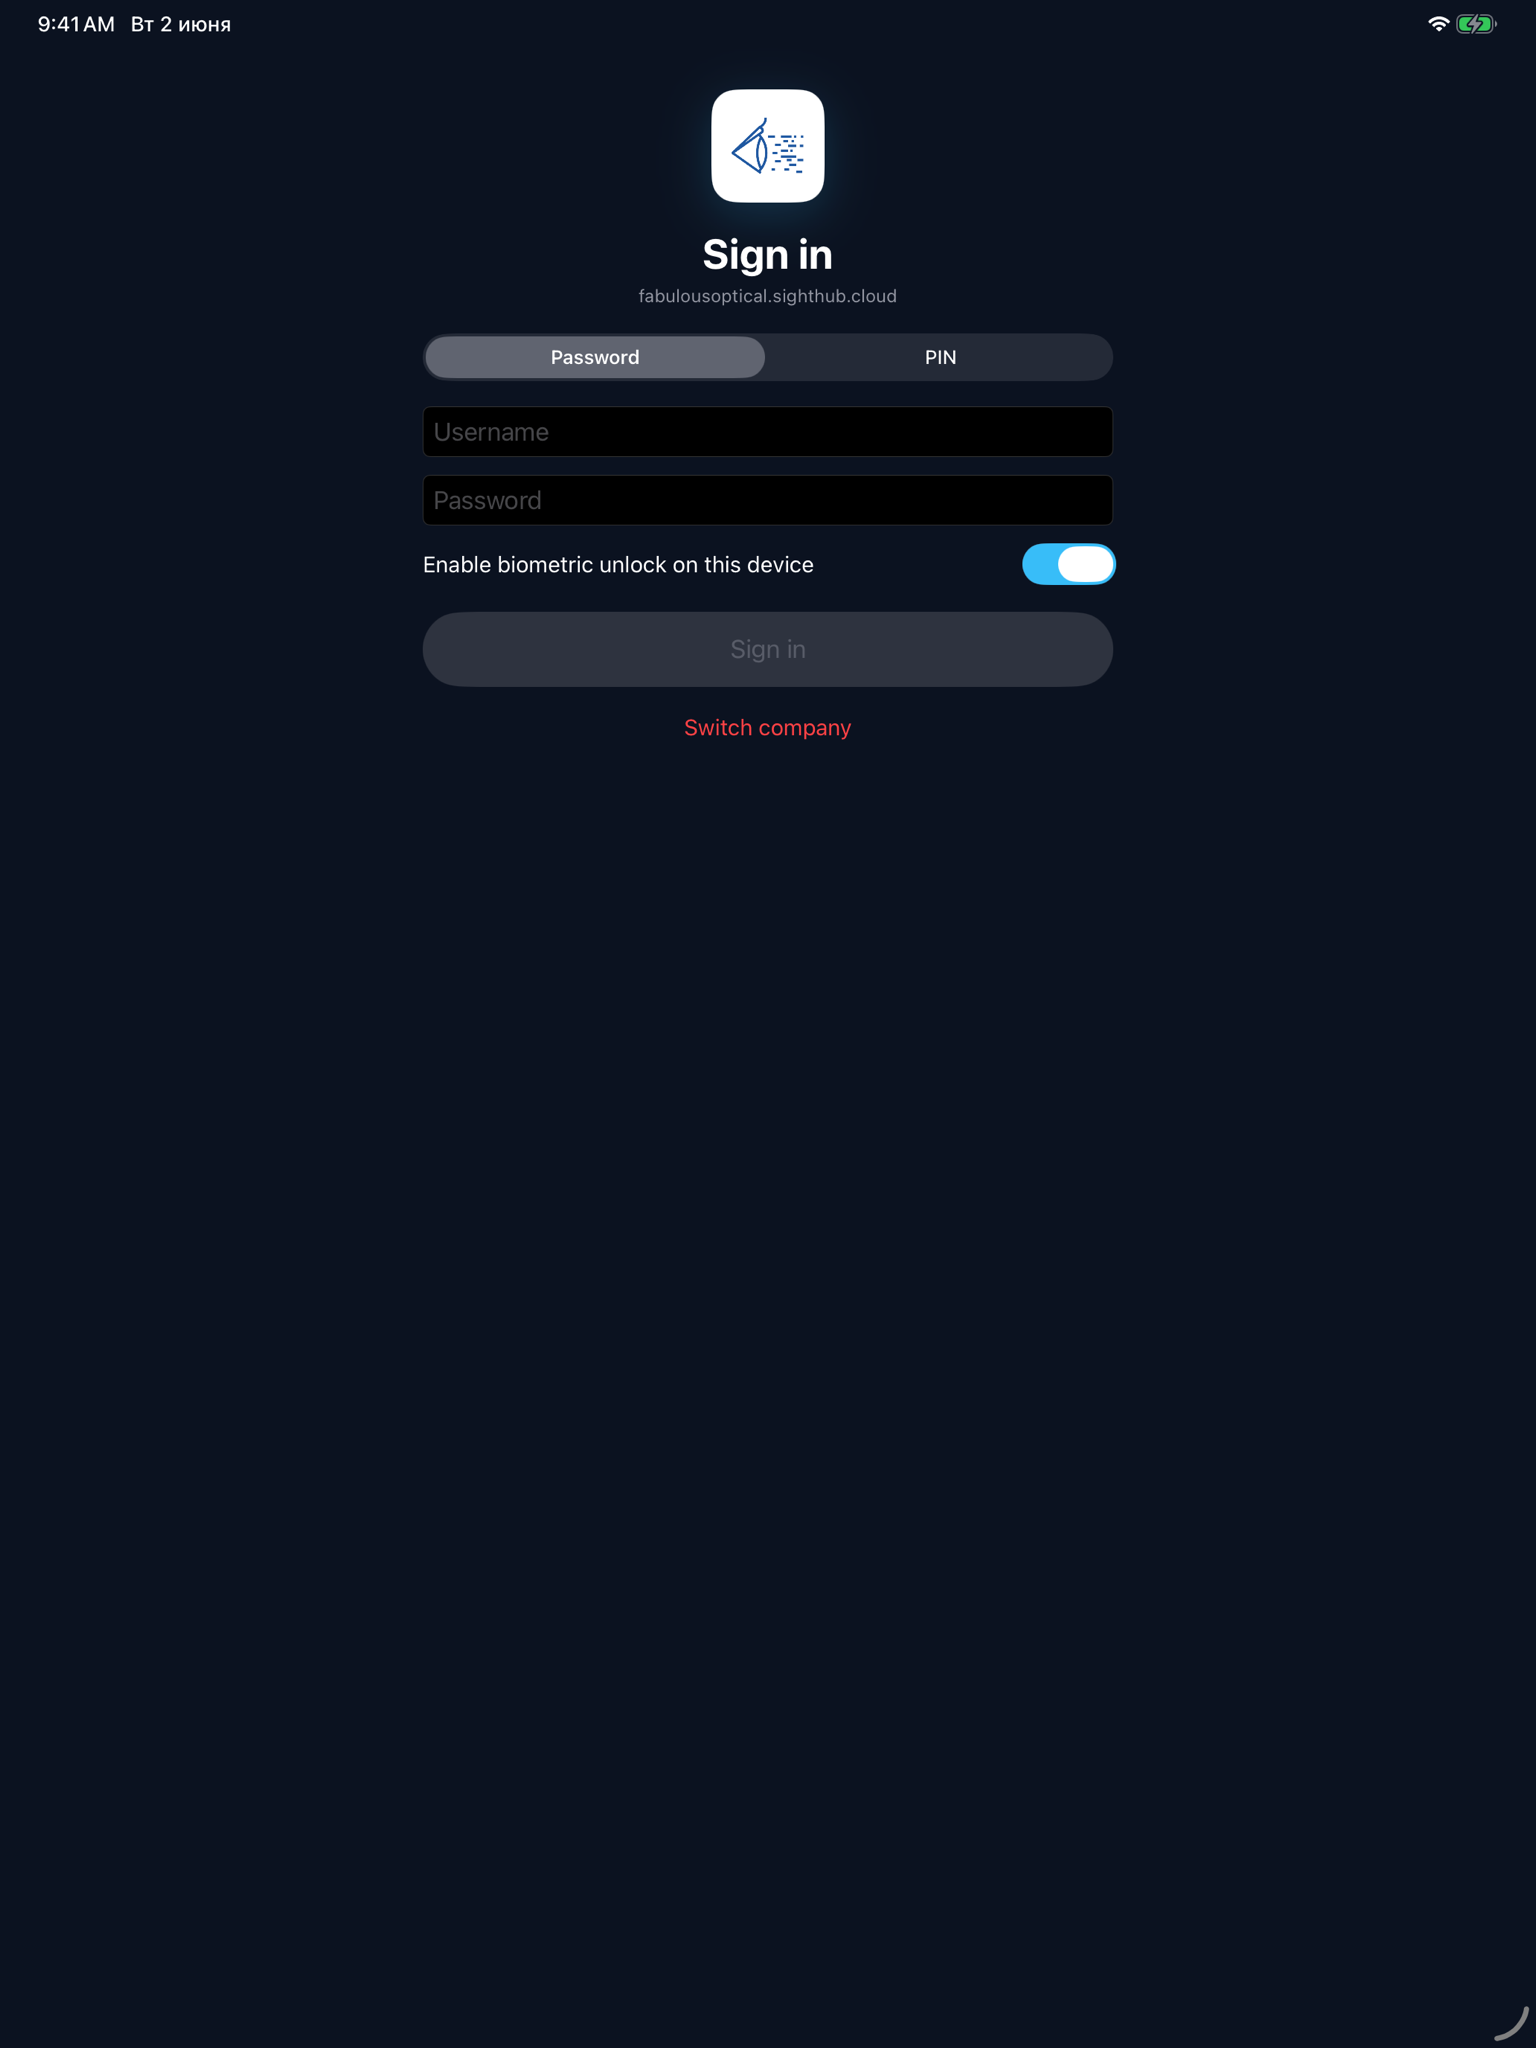
The heading reads Sign in and directly underneath it, in small grey type, is
the workspace you are connected to — fabulousoptical.sighthub.cloud in the
screenshot above. Check that line before typing anything: it is the app telling
you which company it is about to sign you into.
A segmented control switches between two ways in:
Password — your Username and Password. The username field does not
autocapitalise or autocorrect, so it goes in exactly as issued.
PIN — a 5-digit Express PIN, for signing in quickly during a shift. The
button stays disabled until exactly five digits are entered. You create the PIN
yourself from Profile → Security → Generate Express PIN; there is no PIN until
you do.
Below the fields is Enable biometric unlock on this device, on by default —
see the next section.
Switch company at the bottom signs out, forgets the saved workspace and the
biometric enrolment on this device, and returns to the workspace screen.
If you are asked to change your password
When the server requires a password change, signing in lands on Change
password instead of the home screen. Enter the current password and a new one
of at least 8 characters. The app stays on this screen until the change succeeds.
iOS — Biometric unlock
Biometrics are how you avoid retyping a password at the start of every shift.
They are set up during sign-in and used on every launch afterwards.
Turning it on
Leave Enable biometric unlock on this device switched on when you sign in
with a password or PIN. The device is enrolled as part of that sign-in, and
labelled automatically with its model and iOS version so you can recognise it
later in the device list.
Enrolment happens once per device. If the device is already enrolled, signing in
again does not re-enrol it — the existing enrolment stays as it is.
Using it
Once enrolled, the sign-in screen changes:
- A Unlock with biometrics button appears under the sign-in button.
- The biometric prompt also fires by itself as soon as the screen opens, so in
practice you open the app and are simply asked for your face or finger.
The prompt is the standard iOS one, captioned Unlock SightHub. It accepts Face
ID or Touch ID, and falls back to the device passcode if biometrics fail or
are unavailable — so a failed face scan is never a lock-out.
Cancelling the prompt just returns you to the sign-in screen with the password and
PIN options intact.
App lock
While you are signed in, the app locks itself the moment it leaves the foreground
— app switcher, another app, screen off. Coming back shows a blurred SightHub
locked panel over the app with two choices: Unlock, which asks for
biometrics or the passcode again, or Sign out.
This is separate from signing in. Unlocking does not re-authenticate against the
server; it only reveals the session already running.
Managing enrolled devices
Profile → Security → Biometric devices lists every device enrolled on your
account, each with its label and when it was last used. The trash icon revokes
one, which immediately stops biometric unlock on that device — the way to shut
down a lost or handed-over phone. When nothing is enrolled the list reads No
biometric devices enrolled.
Signing out keeps your biometric enrolment, so the next sign-in is still one
prompt. It is cleared only by Switch company, by revoking the device from this
list, or if the account is deactivated.
iOS — Home
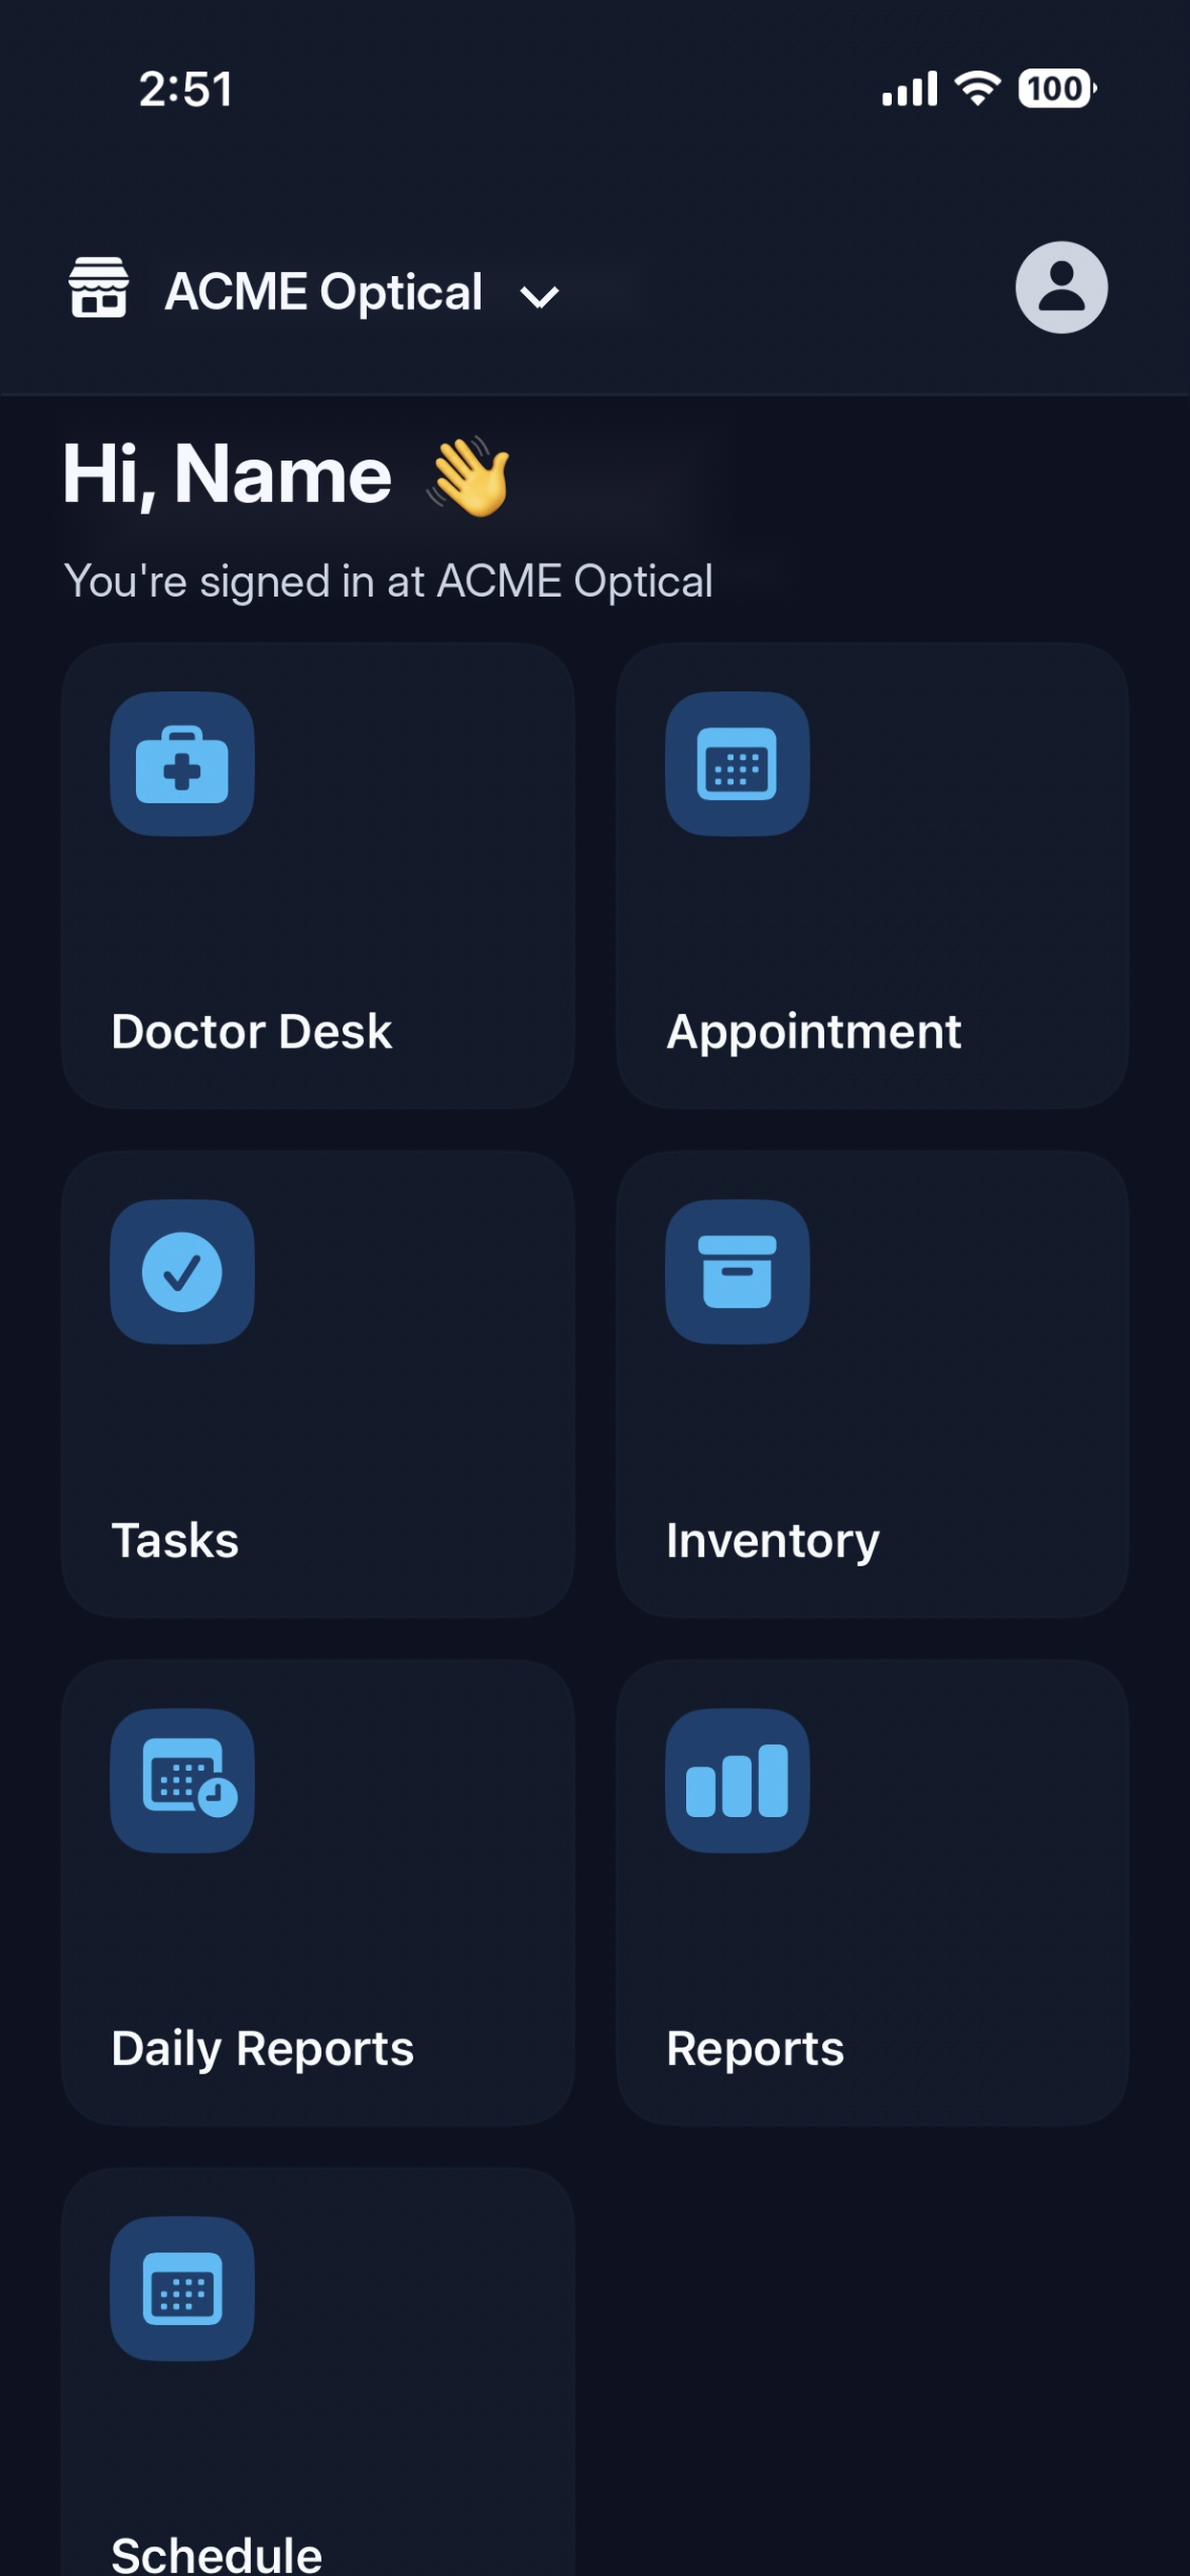
The screen you land on after signing in, and the hub for everything else.
- Store switcher, top left — the storefront name with a chevron. Tap to change
the store or warehouse you are working in (see below). - Profile, the avatar top right.
- Greeting — Hi, and a line confirming which store you are
signed in at. - Tile grid — two columns of large tiles, one per section you have access to.
The grid is not fixed. The server sends the list based on your permissions, so
two people in the same shop can see different tiles, and a tile you cannot see is
a permission that has not been granted. Tiles carry a red badge with a live
count when a section is waiting on you.
Typical tiles are Doctor Desk, Appointment, Tasks, Inventory, Daily Reports,
Reports and Schedule. Sections that do not yet have their own native screen in
the iOS app open a placeholder page naming the section rather than a working
screen.
Pull down to refresh re-reads the tiles, the badge counts and the store list.
Switching store or warehouse
Tapping the store name opens Switch store, listing the storefronts you have
access to with their warehouses nested underneath, a checkmark against the
current one. Picking an entry switches your active location and reloads the home
screen; the greeting and the tiles follow the new location.
This is the switch the rest of the app reads. The team schedule in particular
needs it resolved, so open Home once after launching if you go straight for
another screen.
iOS — Tasks
The team to-do list, with comments and history.
A segmented filter across the top chooses Assigned to me, Created by me or
All. Each card shows the title, a two-line description, a status chip, a
priority chip, the due date, and who it is assigned to and who created it.
Creating — the + in the toolbar opens New task: Title, Description,
Assignee, Priority (Low / Medium / High), and an optional Due date behind a
toggle. Title and Assignee are required; Create stays disabled until both are
filled. After creating, the list switches to Created by me so you see what you
just made.
Working a task — tapping a card opens the detail:
- Status — a segmented control, To do / In progress / Done. Changing it
saves immediately. - Edit (pencil) — reopens the same fields as creation.
- Delete (trash) — offered only while the task is still To do, so work
that has been started cannot be quietly removed. - Comments — type in the field and send with the paper-plane. Your own
comments carry a ⋯ menu with Edit and Delete; Delete asks for confirmation
and removes the comment for everyone. Other people's comments have no menu. - History — an automatic trail of what changed, by whom and when.
iOS — Appointments
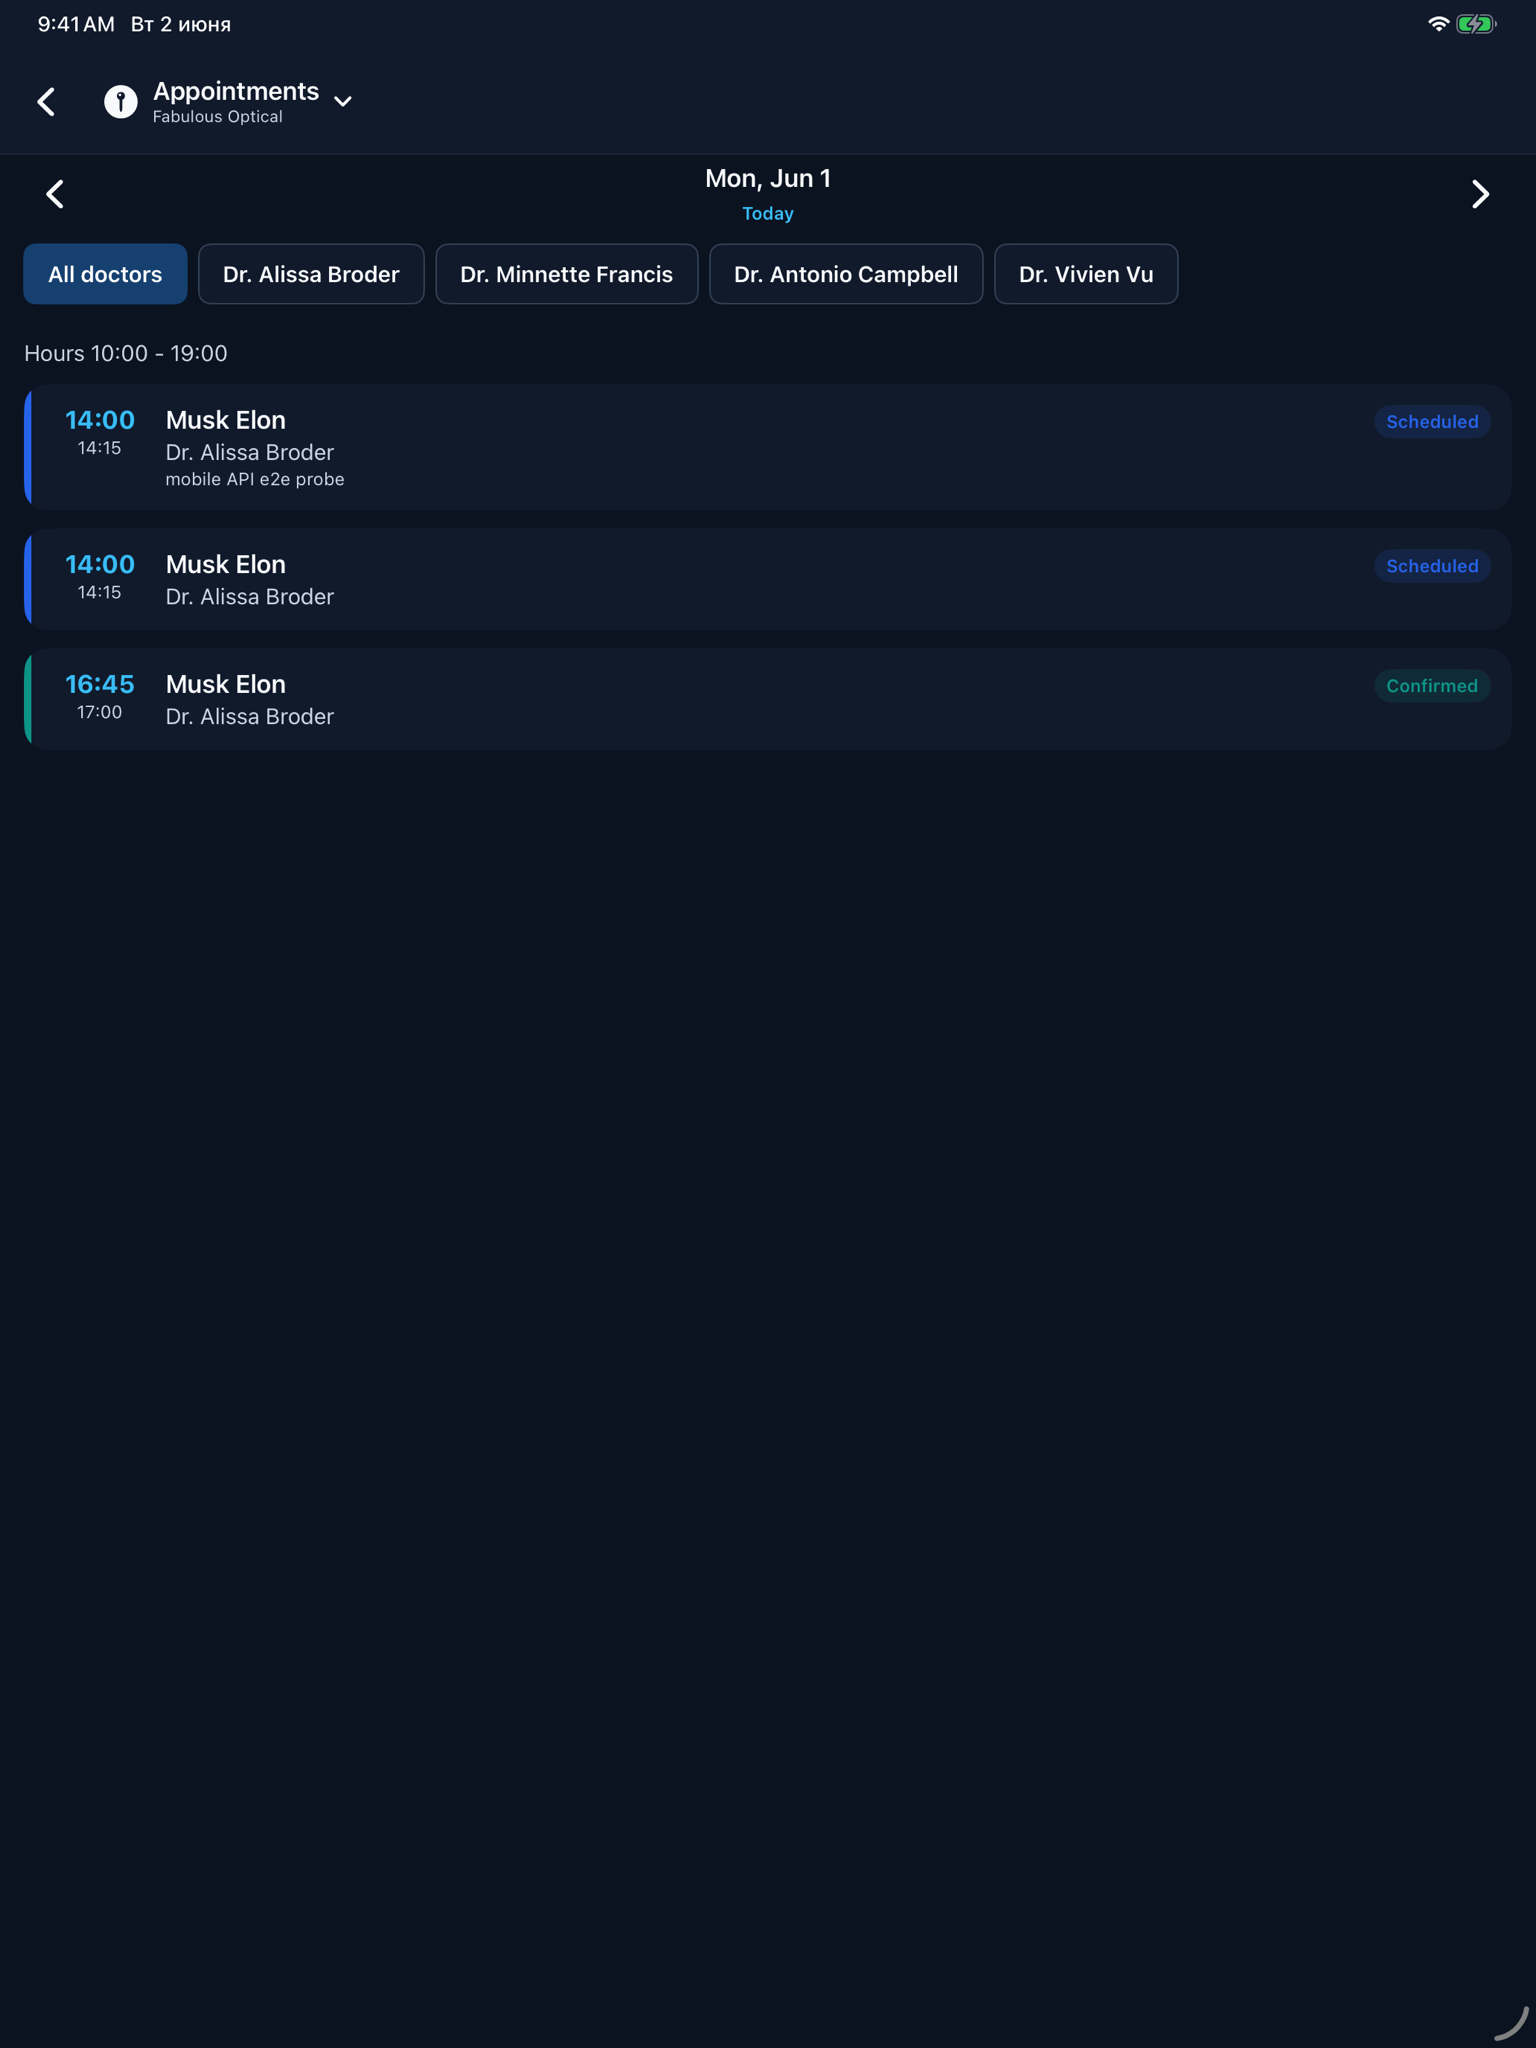
A read-only day view of the patient book.
- Location — the pin in the top bar switches storefront, and reloads the
doctors and the day with it. - Day pager — chevrons step one day at a time; Today jumps back.
- Doctor chips — a horizontal row starting with All doctors. Selecting one
narrows the day to that doctor. - Opening hours for the location appear above the list.
Each appointment card shows start and end time, the patient, the doctor, any
notes, and a status chip colour-coded by state: Scheduled, Confirmed, Checked
in, Completed, No show and Cancelled each have their own colour, repeated as a
stripe down the left edge of the card.
Days the location is closed read Closed on this day; an open day with nothing
booked reads No appointments.
iOS — Team
Two tabs behind one segmented control: Schedule and Employees.
Schedule
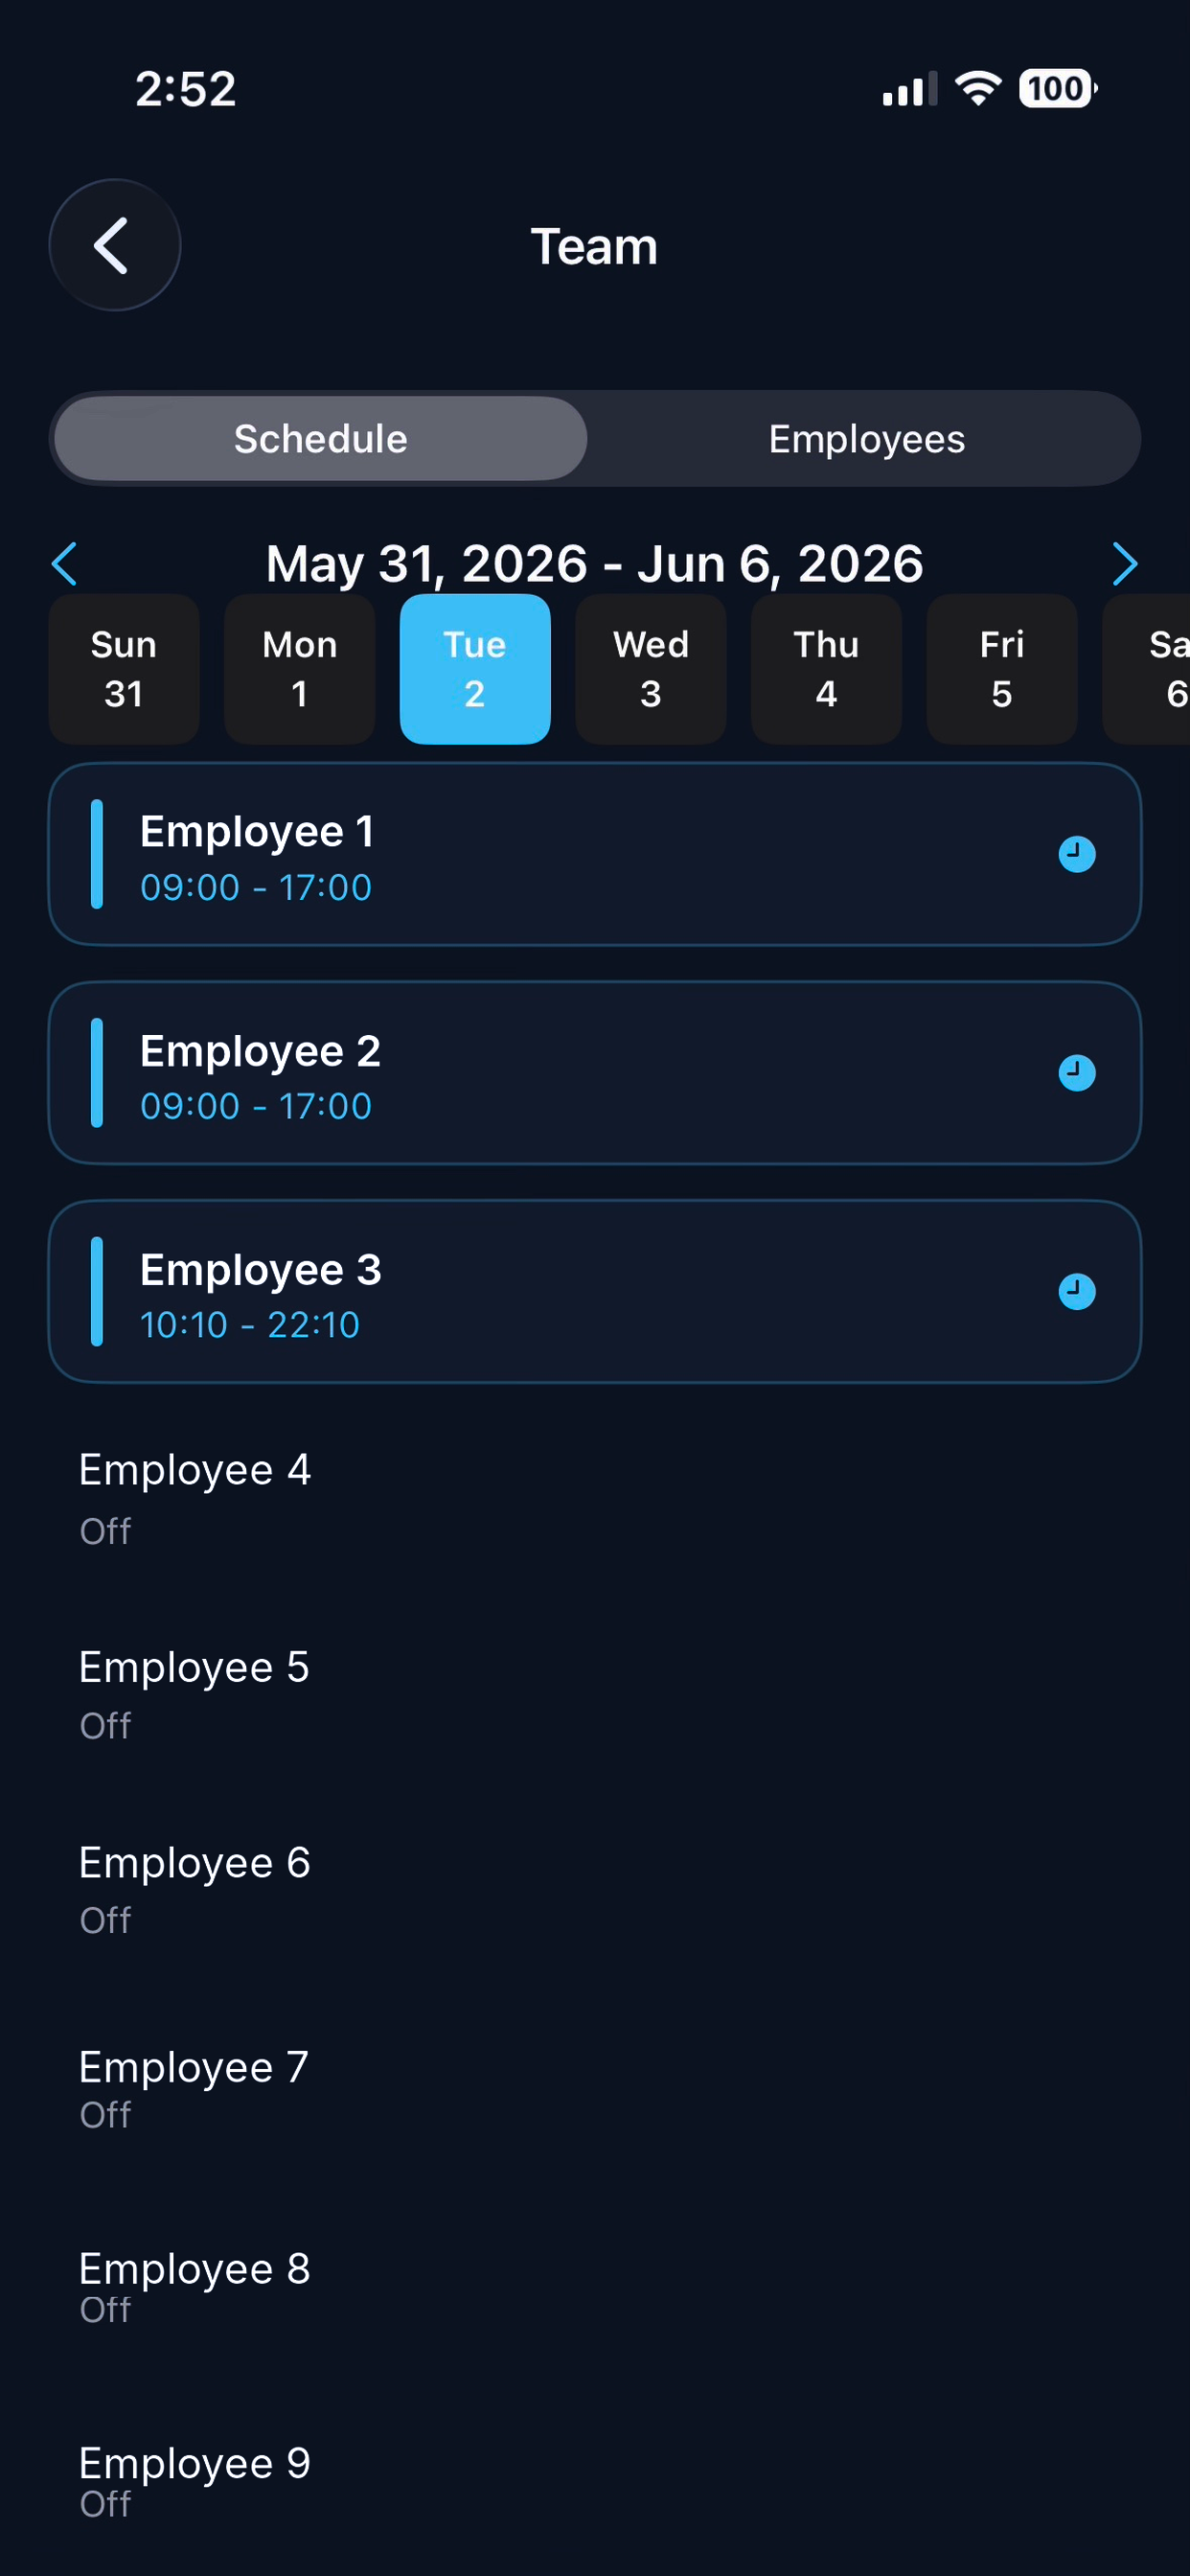
Who is working, for the store you are currently signed in at.
Chevrons move week by week, and the row of seven day chips picks the day — the
selected day is filled in blue. The store's own opening hours for that day appear
above the list.
The list puts people who are working first, sorted by start time, then
everyone else alphabetically. Working rows are visually promoted: a blue bar down
the left, a card background, a bordered outline, the hours in blue, and a clock
icon on the right. People who are off are dimmed and simply read Off. A row
whose hours were changed from the default rota is tagged Modified.
If the screen asks you to Open Home once to resolve the active store, it is
telling you it does not yet know which store to show — open Home, then come back.
Employees
The staff directory: a search field filtering by name, username or email, and a
list showing each person's name and job title, with an Inactive chip on
deactivated accounts. Tapping through opens their record — General (name, email,
phone, status), Address, and Role (username, job title, whether they are a
provider).
iOS — Daily Report
End-of-day reconciliation for one date, read-only.
The date pager at the top has chevrons, a tappable date picker and a Today
shortcut. Everything below reloads when the date changes.
- Sales — the day's total in large type, with Invoices, Net and
Tax beside it, and the invoice-payments total underneath. - Invoices — every invoice on the day: customer, invoice number, employee,
amount, and any discount in red. - Reconciliation — one row per payment type comparing Computer against
Count. The difference is shown on the right and turns red whenever it is
not zero, which is the number you are looking for on this screen. - Count sheet — the counted amount per payment method.
- Transfer credit — Positive, Negative and Total.
iOS — Sales Report
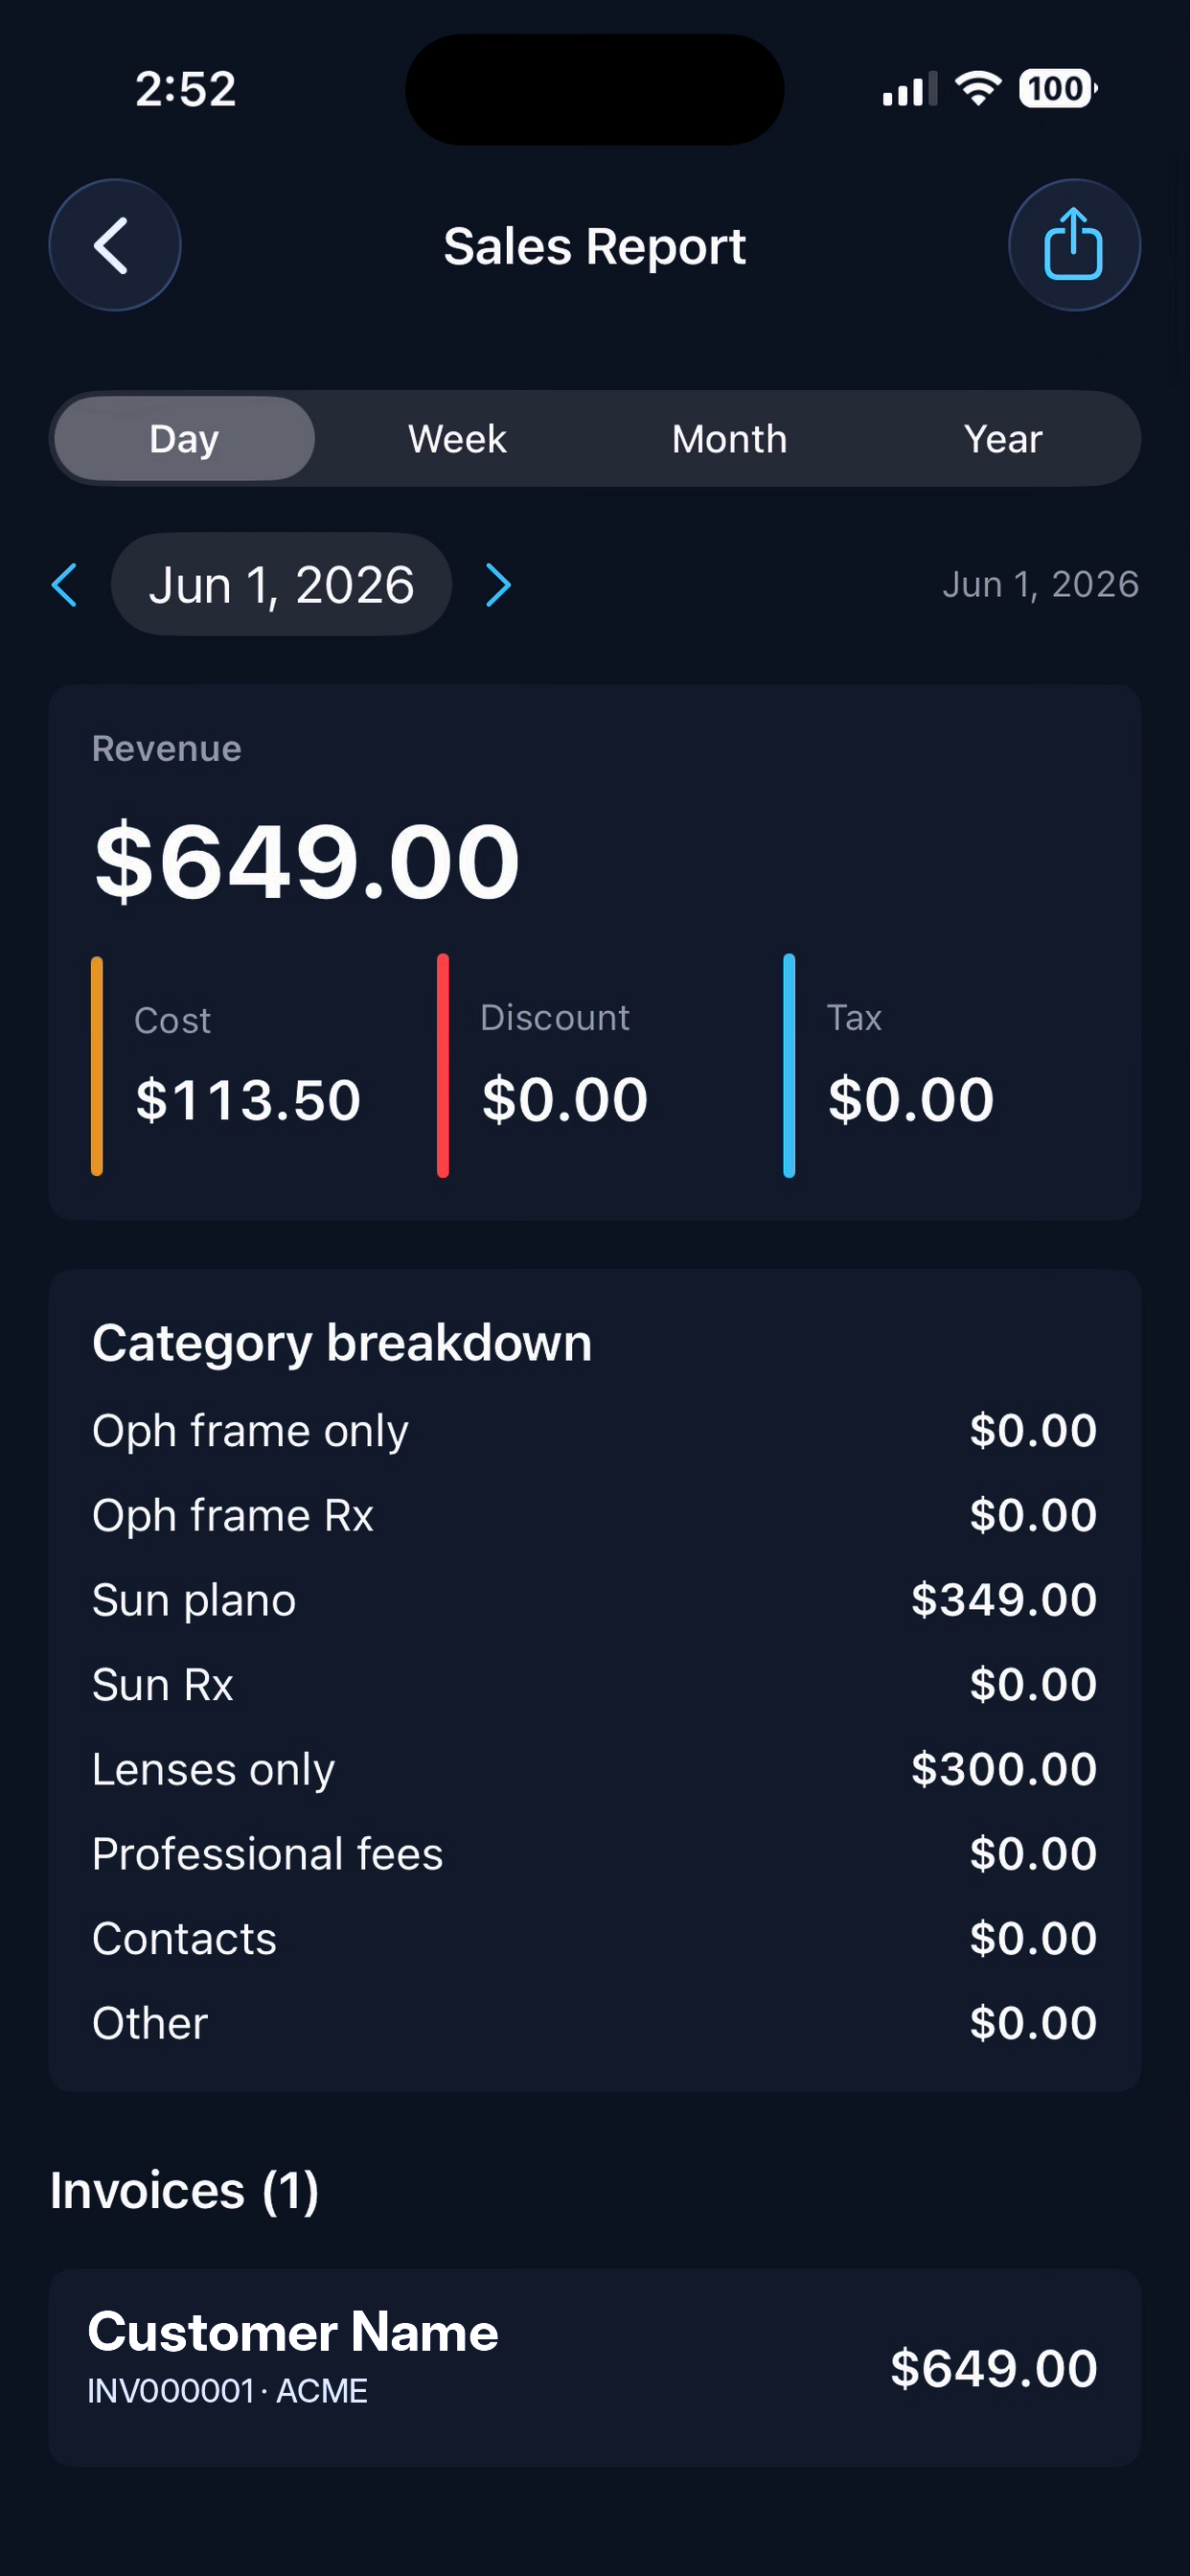
Revenue over a period you choose.
- Period — a segmented control: Day / Week / Month / Year.
- Range pager — chevrons step by the chosen period, or pick a date directly.
- Revenue — the headline figure, with Cost, Discount and Tax.
- Category breakdown — Oph frame only, Oph frame Rx, Sun plano, Sun Rx,
Lenses only, Professional fees, Contacts, Other. - Invoices — the individual invoices behind the total.
The share icon in the toolbar exports the listed invoices as CSV through
the standard iOS share sheet — AirDrop, Mail, Files, anywhere. Columns are date,
invoice, name, total, cost, discount, tax, employee. It appears only when there
is at least one invoice to export.
iOS — Inventory
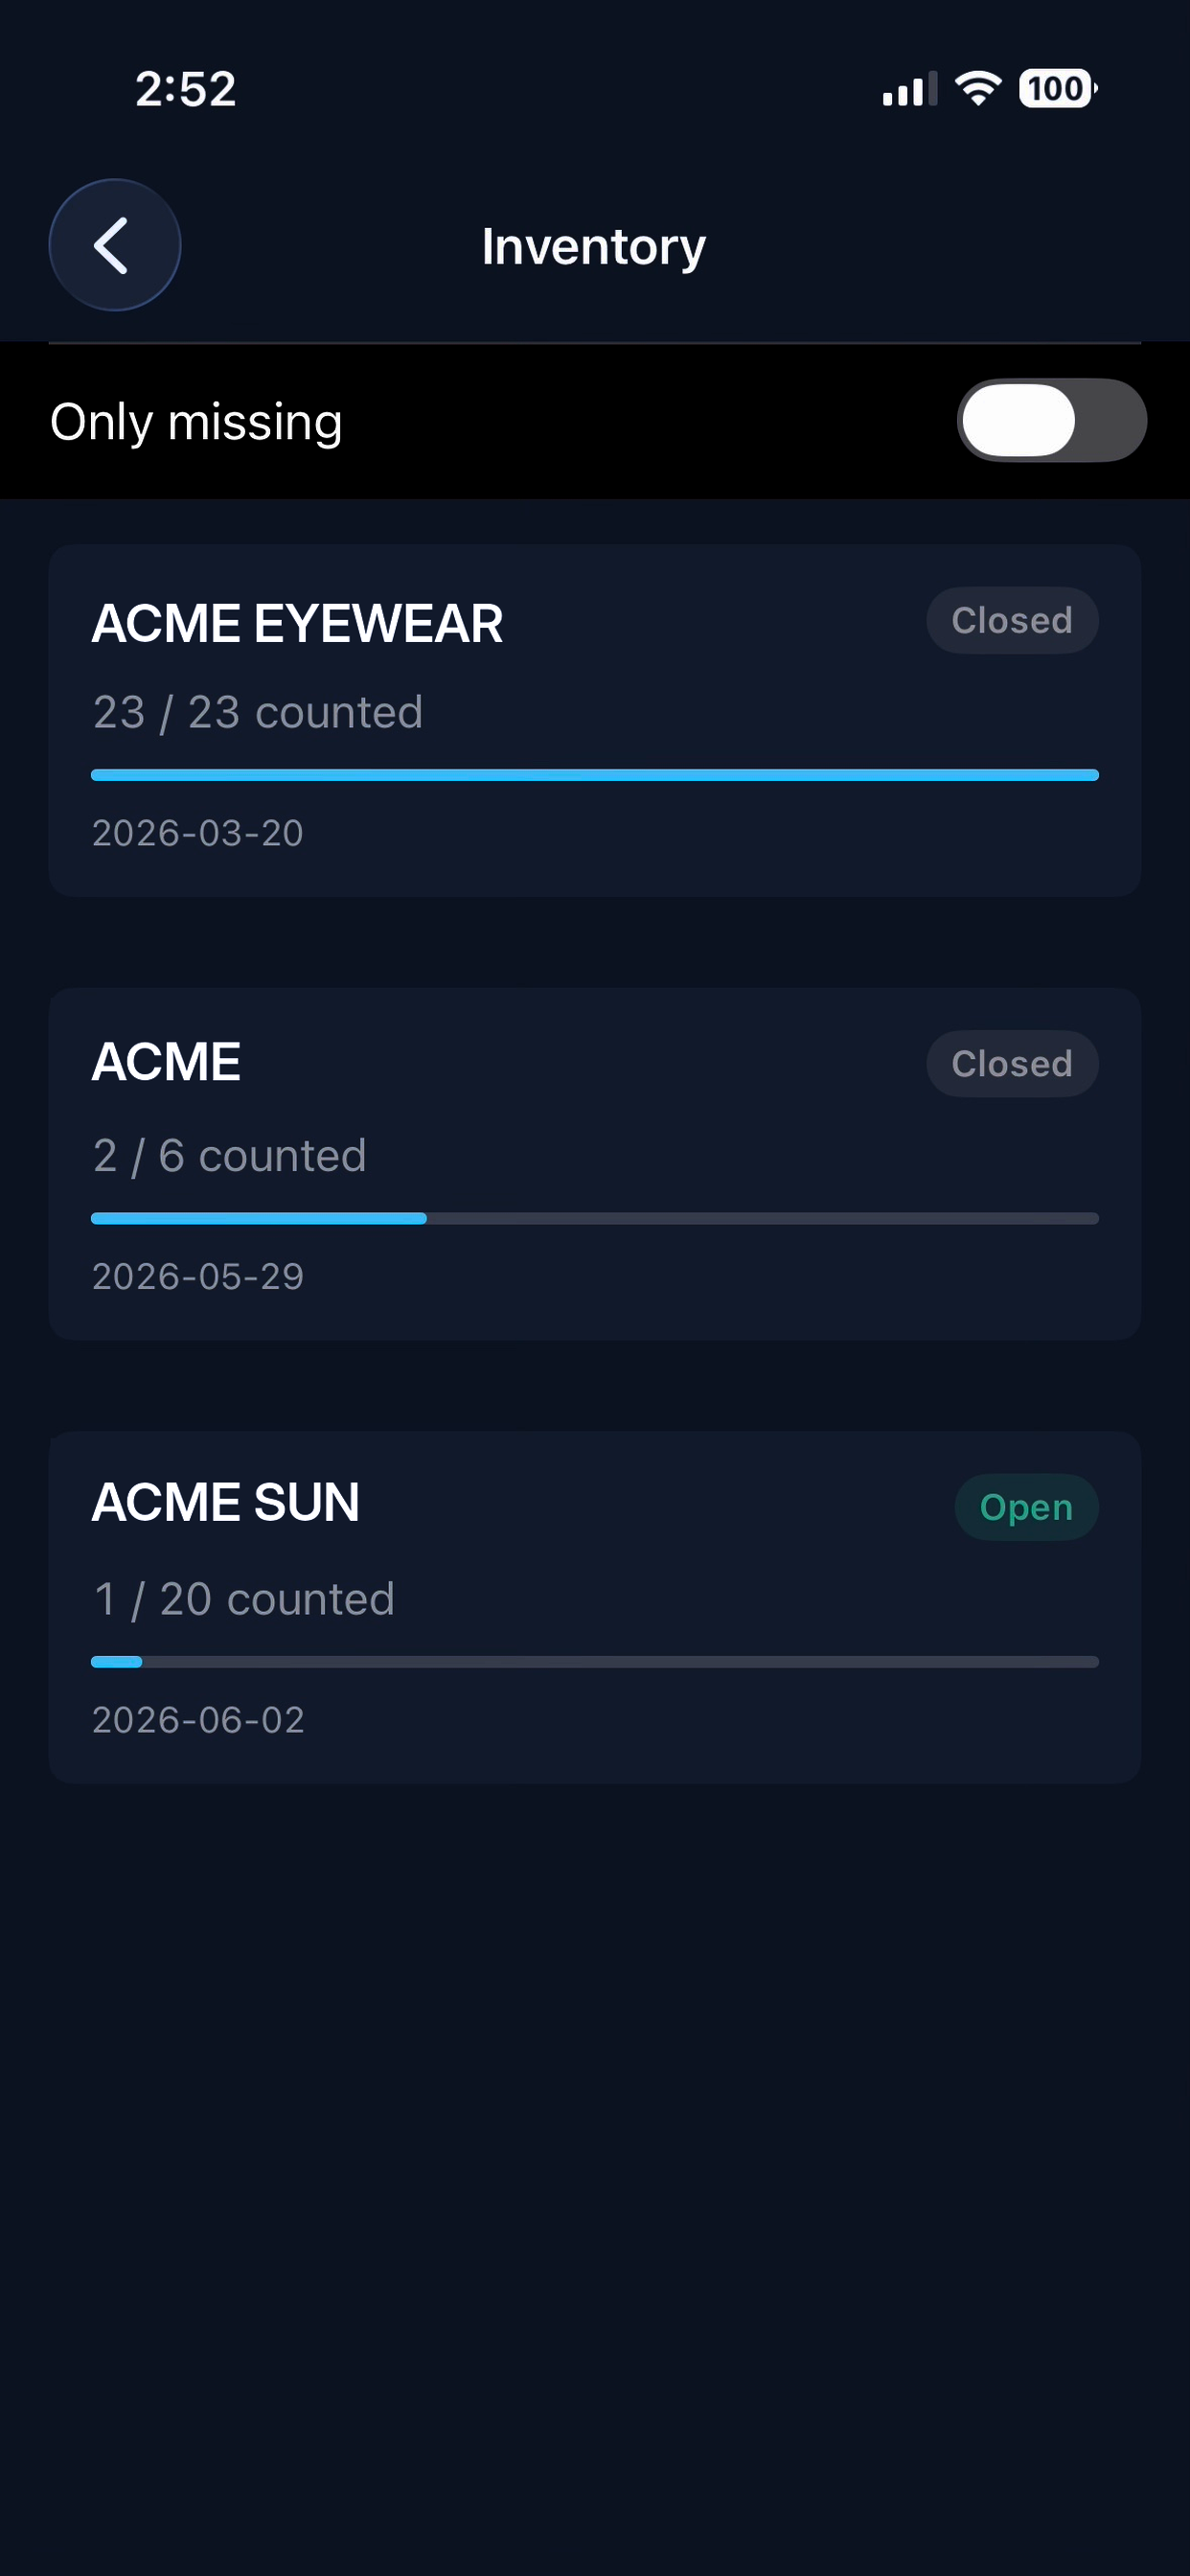
Stock audits, done by scanning frame tags with the camera.
Count sheets
The list shows one card per sheet: brand or vendor, an Open or Closed
chip, a counted / total figure with a progress bar, and the date it was
created. The Only missing toggle at the top narrows the list to sheets with
items still outstanding.
Working a sheet
Opening a sheet shows its progress, location and notes, then two sections:
Missing (n) — still to find — and Counted (n) — already counted, each with
a green check.
Open sheets get a floating Scan button in the bottom corner and a Close
action in the toolbar. Closed sheets are read-only.
Scanning
The scan screen is a live camera view with a white guide rectangle. The app asks
for camera permission the first time; if you decline, the screen explains why it
is needed and offers Allow camera.
- Line a tag up in the guide and the SKU field fills in by itself.
- Or type the SKU by hand. Doing so takes over from the camera, so a manual
correction is not overwritten by the next tag drifting through the frame. - Either way, a lookup runs shortly after the SKU settles and shows what the
scanner found: product name, brand, vendor, variant, location and price —
confirm it is the right item before committing. - Add to count sheet records it. The running counted / total in the header
and the navigation title both tick up, the field clears, and you can go
straight on to the next tag.
Looking up a tag without counting
Profile → Inventory → Scan tag is the same camera and the same lookup, with no
count sheet attached — for checking what an item is and what it costs.
iOS — Scanning documents from the web app
Sending a paper document into a patient's file, using the phone as the scanner
for the desktop app.
Start from Profile → Documents → Scan QR to upload documents. Point the camera
at the QR code the SightHub web app shows on the shop computer. Anything that is
not a SightHub code is refused with Not a SightHub QR code.
The scan session opens showing what you are scanning into — the patient document
or insurance card it is attached to, and when the session expires. From there:
- Scan pages opens Apple's own document camera, which finds the page edges and
corrects the perspective for you. Capture as many pages as you need. - Captured pages appear as numbered thumbnails; the ✕ on a thumbnail drops
that page. - Finish & submit combines every page into a single multi-page PDF, uploads
it, files it against the target, and closes the session. The screen confirms and
closes itself. - Cancel in the toolbar releases the session without uploading.
You can also arrive here by tapping a scan link from a notification — the app
routes you straight into the session.
iOS — Profile
Your own account, reached from the avatar on the home screen.
- Header — name, email and phone.
- Hours worked — Today, Week and Month, with a Clocked in chip when you
currently are. - Inventory → Scan tag — the standalone tag lookup.
- Documents → Scan QR to upload documents — the document scan flow.
- Schedule → My schedule — your own week, navigable week by week: hours per
day, lunch, Holiday and Off days, and a Modified tag on days changed
from the standard rota. - Security → Change password — current password plus a new one of at least 8
characters. - Security → Generate Express PIN — confirm with your password and the app
shows your 5-digit PIN, the one the PIN tab on the sign-in screen expects. - Security → Biometric devices — the enrolled-device list described above.
- Notifications → Send test notification — proves push is working on this
device. - Account → Switch company — sign out and forget the workspace.
- Account → Sign out — sign out, keep the workspace and the biometric
enrolment.
iOS — Notifications
The app registers for push the first time you sign in, which is when iOS asks for
notification permission. Declining is not fatal — the rest of the app works
normally, you just get no alerts.
Tapping a notification opens the section it refers to: the schedule, a task list
or one specific task, appointments, the daily report, sales reports, the team, or
a document-scan session.
That destination survives the sign-in screen. If a notification wakes the app
while you are signed out, you unlock or sign in first and land on the right screen
afterwards, rather than being dumped on Home.
Profile → Notifications → Send test notification checks the whole chain end to
end. Signing out unregisters the device, so a phone you have signed out of stops
receiving alerts.
iOS — Signing out
Two different exits, in Profile → Account:
- Sign out ends the session but keeps the workspace address and the biometric
enrolment, so signing back in is one biometric prompt. This is the everyday one. - Switch company ends the session and forgets the workspace and the
biometric enrolment on this device, returning to the workspace screen. Use it
when the device moves to a different SightHub company — and expect to need the
workspace address again.