Integrations — terminals, VisionWeb, TriZetto and OptikamPad
Settings → General → Integrations is where SightHub is wired to the outside world. Five pages down the left: Payments, VisionWeb, TriZetto, Payer Crosswalk and OptikamPad. TriZetto and Payer Crosswalk belong together and are what make electronic claims possible. The start page shows the same five as tiles, each with a one-line description.
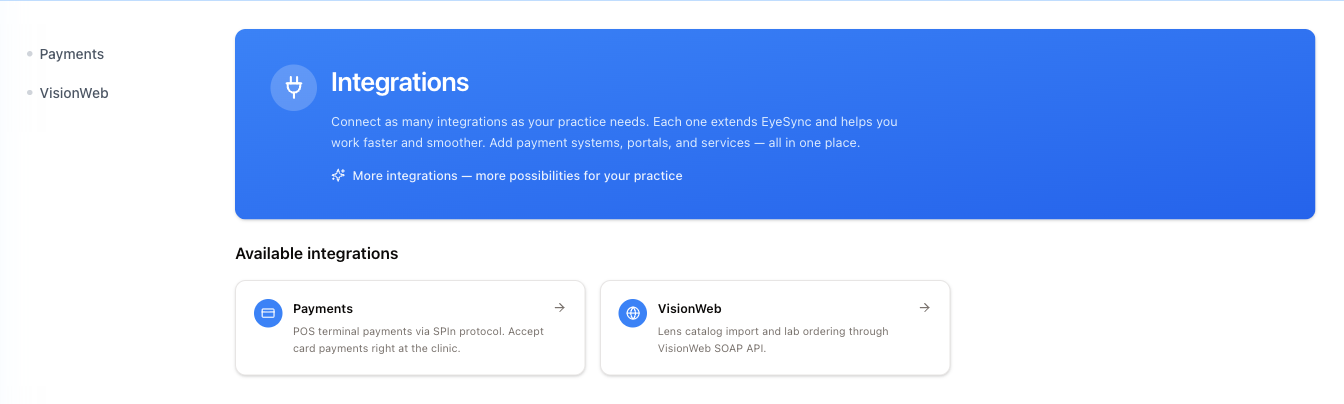
All of them need credentials that come from the provider, not from us. VisionWeb, TriZetto and OptikamPad are set up per store; Payments is not — terminals are registered for the practice as a whole, with one of them marked as the default.
Payments — card terminals
Connects the practice's SPIn POS terminals. Once a terminal is registered here, staff charge a patient's invoice straight from the payment screen — the amount is sent to the terminal, the patient taps the card, and the result comes back into the invoice. No re-typing the sum, no separate terminal receipt to reconcile.
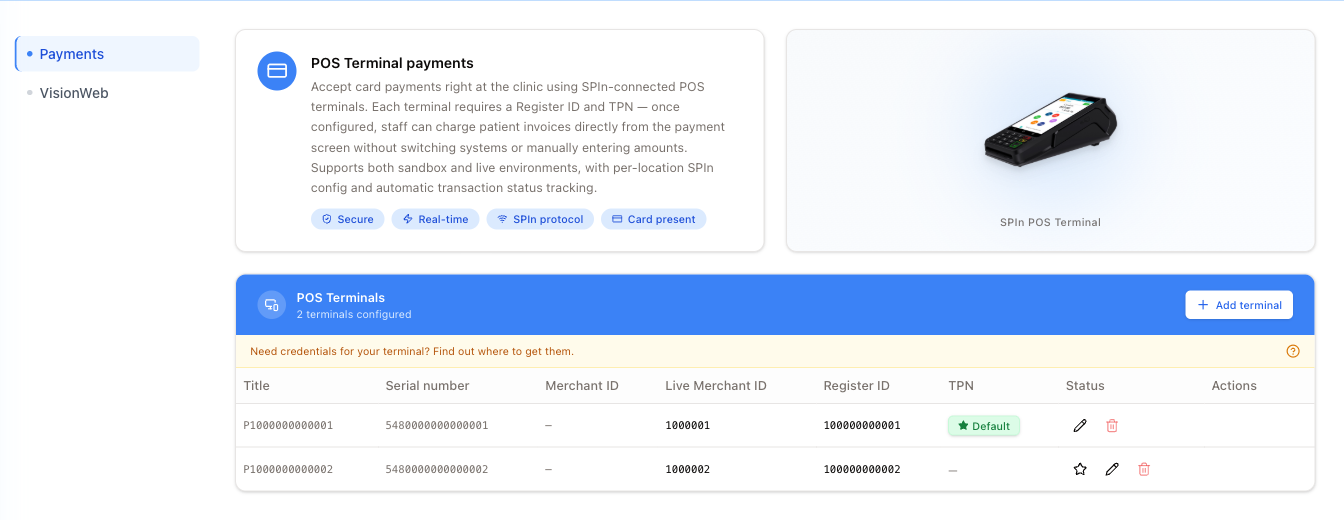
Add terminal in the blue header adds a new one. Every terminal is one row with its serial number, Merchant ID, Live Merchant ID, Register ID and TPN, then a Default badge on one terminal — that is the one pre-selected at the till — and the action icons. Be aware that the row currently leaves out the terminal's title, so each value sits one column to the left of its heading: the serial number under Title, the Default badge under TPN, the icons under Status. Open a terminal to see its title and its full live IDs.
The star icon moves the Default badge to another row; the pencil (or a click on the row) edits; the bin removes the terminal after a Delete terminal? confirmation.
The amber strip above the table — Need credentials for your terminal? Find out where to get them. — has a ? button at its right end. Press it before you start: the numbers come from the provider's portal, you do not make them up. The dialog it opens tells you to sign in at portal.ipospays.com and go to S.T.E.A.M → Edit Parameters → About Device, where everything the form asks for is on one screen.
Adding or editing a terminal
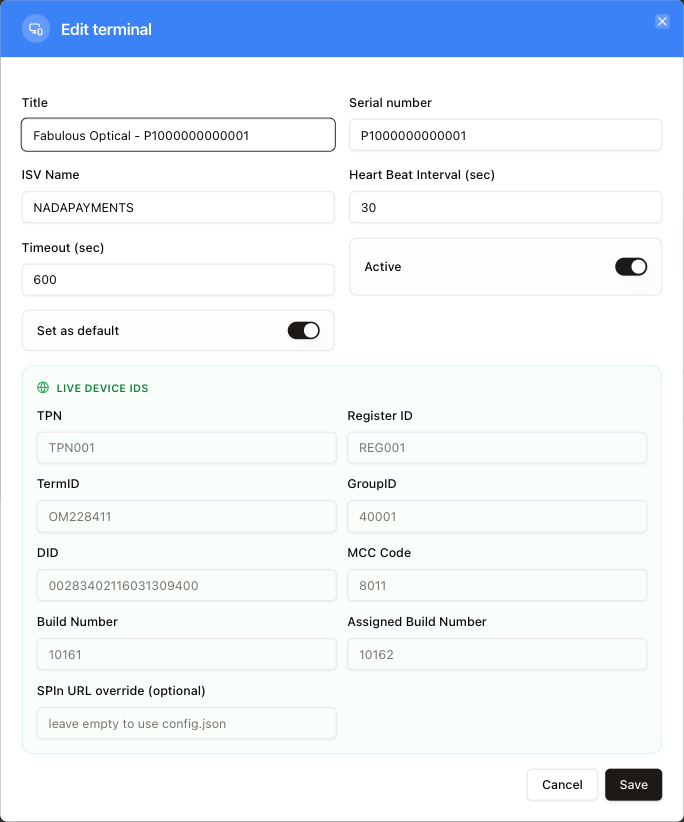
The top half is the terminal as your staff see it:
- Title — the name in the list. Something recognisable, e.g. store — serial number.
- Serial number — printed on the device.
- ISV Name — the payment provider, e.g. NADAPAYMENTS.
- Heart Beat Interval (sec) — how often SightHub checks the terminal is alive. 30 is normal.
- Timeout (sec) — how long to wait for the patient to complete the tap before giving up. 600 is normal.
- Active — whether the terminal can be used at all.
- Set as default — makes this the terminal offered first.
Live device IDs below is the block that must match the device exactly: TPN, Register ID, TermID, GroupID, DID, MCC Code, Build Number, Assigned Build Number. One wrong digit and the charge does not reach the terminal. TPN is the one field the form insists on — without it Create / Save stops with At least one TPN (sandbox or live) is required. SPIn URL override (optional) stays empty unless the provider tells you otherwise.
VisionWeb — lens catalogues and lab orders
Connects a store to VisionWeb, so lens catalogues can be pulled in and orders sent to the labs electronically instead of by phone or fax.
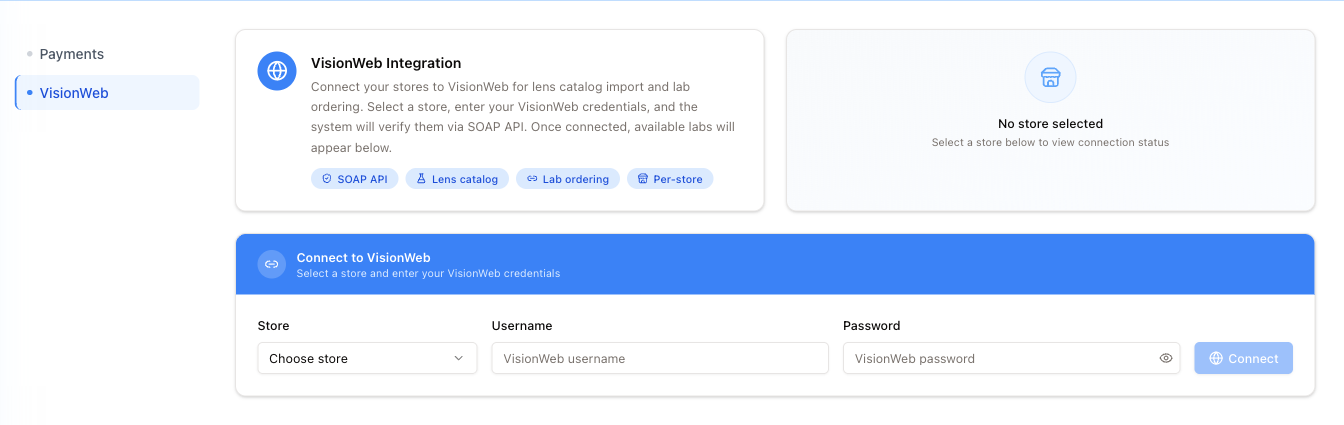
The connection is per store, not per practice: choose the store, enter the VisionWeb username and password for it, and press Connect. SightHub checks the credentials against VisionWeb before saving them, so you learn immediately whether they are right.
Once a store is connected, the labs available to it appear underneath. Those labs are then what the lab ticket can send a lens order to.
A store with no VisionWeb account still works normally — its lab tickets are simply handled outside the system.
TriZetto — filing claims electronically
Connects the practice to TriZetto / Gateway EDI, the clearing house claims go through. Claims leave as an 837P file dropped on TriZetto's SFTP server; the same credentials also drive the real-time eligibility check. What you do with them afterwards is on Sending claims electronically.
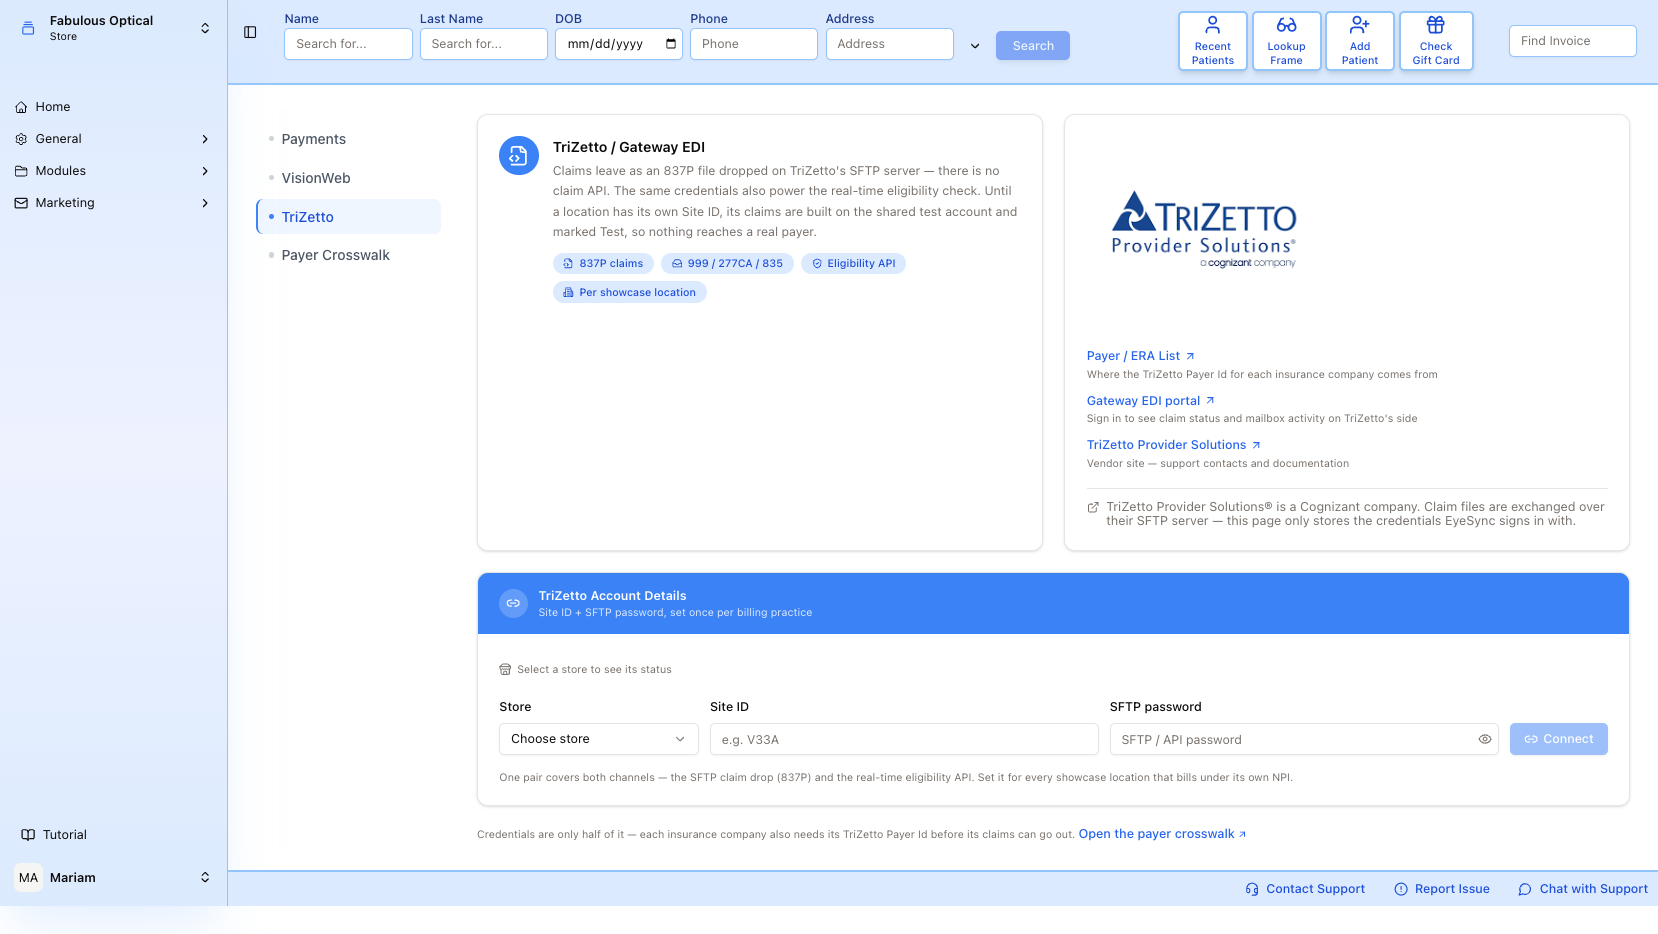
The right-hand card holds the three links you will actually need: the Payer / ERA List (where each insurer's TriZetto Payer Id comes from), the Gateway EDI portal (claim status and mailbox activity on TriZetto's side) and TriZetto's own support pages.
First, the store's own numbers
Below the cards, an amber box — Before connecting, fill these in under each store's settings — names the two store fields a payer will not accept a claim without:
- Tax ID / EIN — the practice's federal tax number, box 25 on the CMS-1500.
- Billing NPI — Type 2, the organization's NPI, not the doctor's.
Claims from a store missing either one are refused by the payer. Open store settings takes you to Stores. There, on each location's Practice Details tab, the two fields are called Tax Number and Organization NPI.
The box is always there, even before you pick a store — it is a reminder, not a sign that something is missing.
Account details, per store
One pair of credentials — Site ID and SFTP password — covers both channels, the claim drop and the eligibility API. Set it for every location that bills under its own NPI.
Choose the store first (only shop locations are listed — warehouses never bill); the card then shows that store's state. Type the Site ID and SFTP password and press Connect — or Update once the store already has a Site ID. The password is never shown back, so the box is always empty when you come back — and both boxes are required every time, so changing the Site ID means typing the password again too.
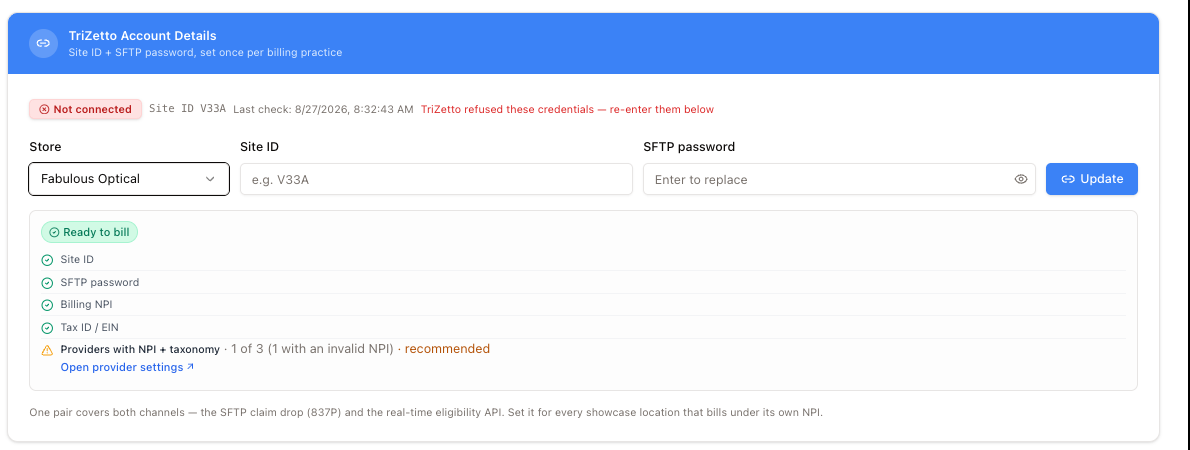
Two things are worth reading carefully here.
The strip at the top is the connection: green Connected; red Not connected with the reason and the time of the last check; or red Not configured when the store has no Site ID yet (with the note that its claims go out on the test account). TriZetto refused these credentials means the Site ID or password is wrong — re-enter them below.
The checklist underneath is readiness to bill, which is a different question. It ticks off:
- Site ID and SFTP password — the credentials themselves.
- Billing NPI and Tax ID / EIN — the practice's identifiers, which go in every claim.
- Providers with NPI + taxonomy — how many of your doctors have theirs on file, e.g. 1 of 3 (1 with an invalid NPI). This one is marked recommended rather than required: claims still go without it, but without the rendering provider. Open provider settings jumps to where you fix it.
Green Ready to bill means claims from this store will build.
A store with no Site ID at all still produces claims — they are built on a shared test account and marked Test in the file header, so they never reach a real payer. Handy for rehearsal, and a trap if you assume they went.
Payer Crosswalk
Credentials are only half of it. Every claim carries the payer's TriZetto Payer Id, and that comes from a mapping between your own insurance-company list and TriZetto's directory.
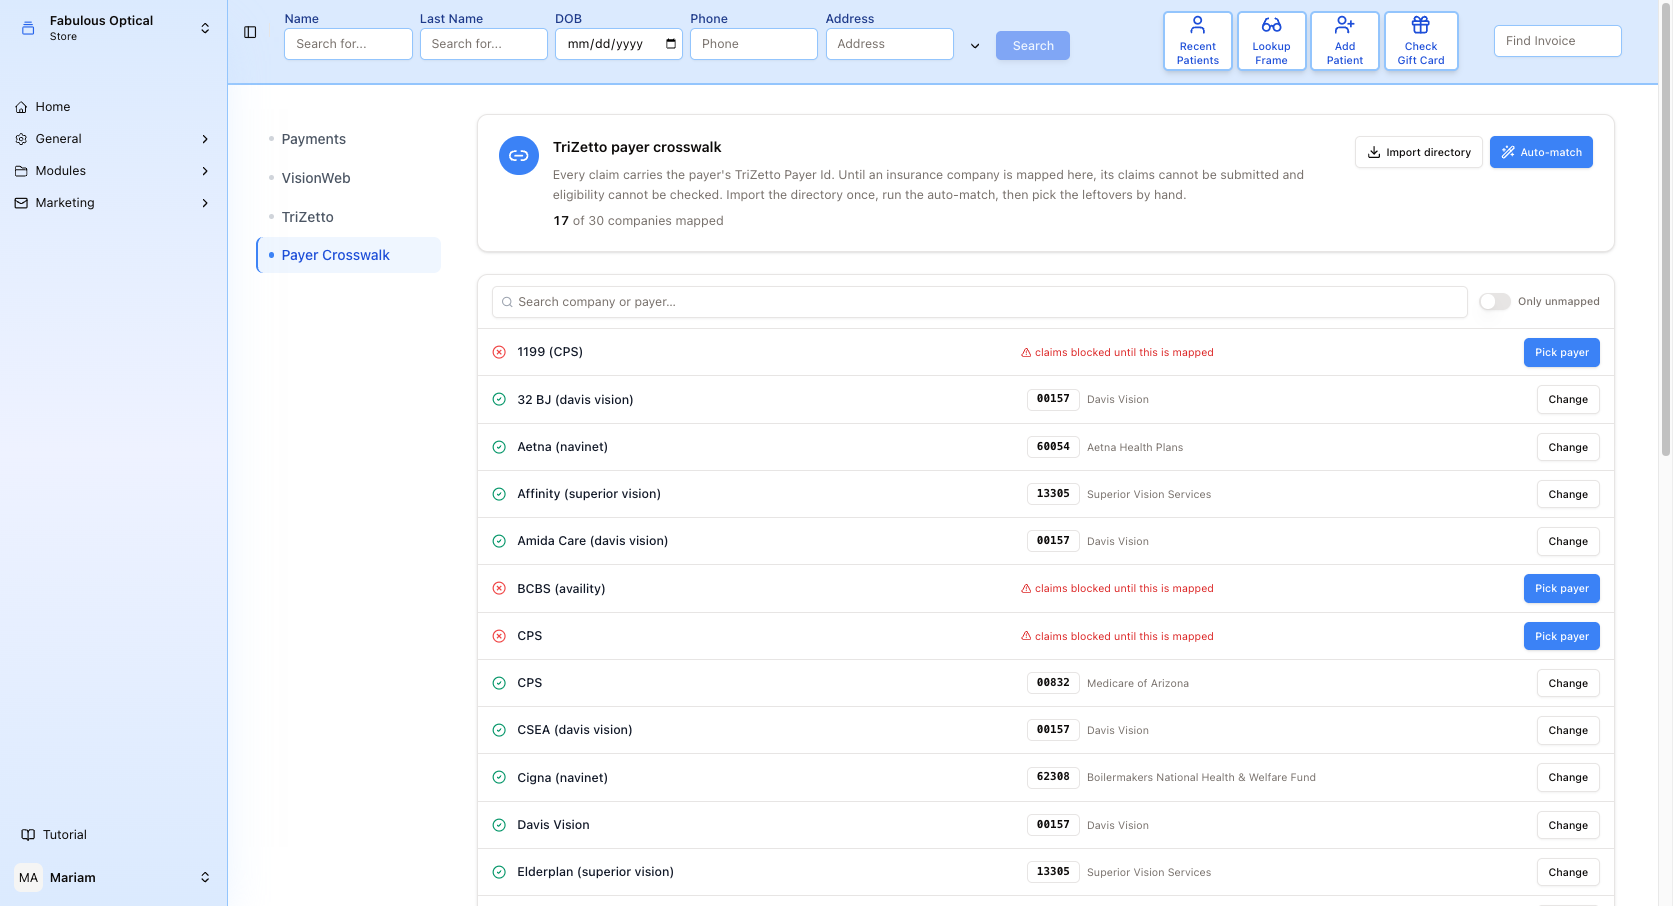
The counter at the top — 17 of 30 companies mapped — is the number to watch. An unmapped company shows a red cross and claims blocked until this is mapped: its claims cannot be submitted and its coverage cannot be checked. Otherwise you only find out on the claim itself, which flags Payer has no TriZetto Payer Id when you open it to send.
Three steps, in order:
- Import directory — loads TriZetto's payer list (about 3,400 payers) after a confirmation. Your company mappings are not touched. Do it once after go-live, and again when TriZetto refreshes its list.
- Auto-match — matches your companies to payers by name. It first shows a preview (Nothing has been written yet) split into Exact, Fuzzy — verify and No match; nothing is saved until you press Apply N matches. Fuzzy matches are a best guess — check them afterwards.
- Pick the leftovers by hand.
Only unmapped filters the list down to the ones still to do, and the search box matches on either your company name or the payer.
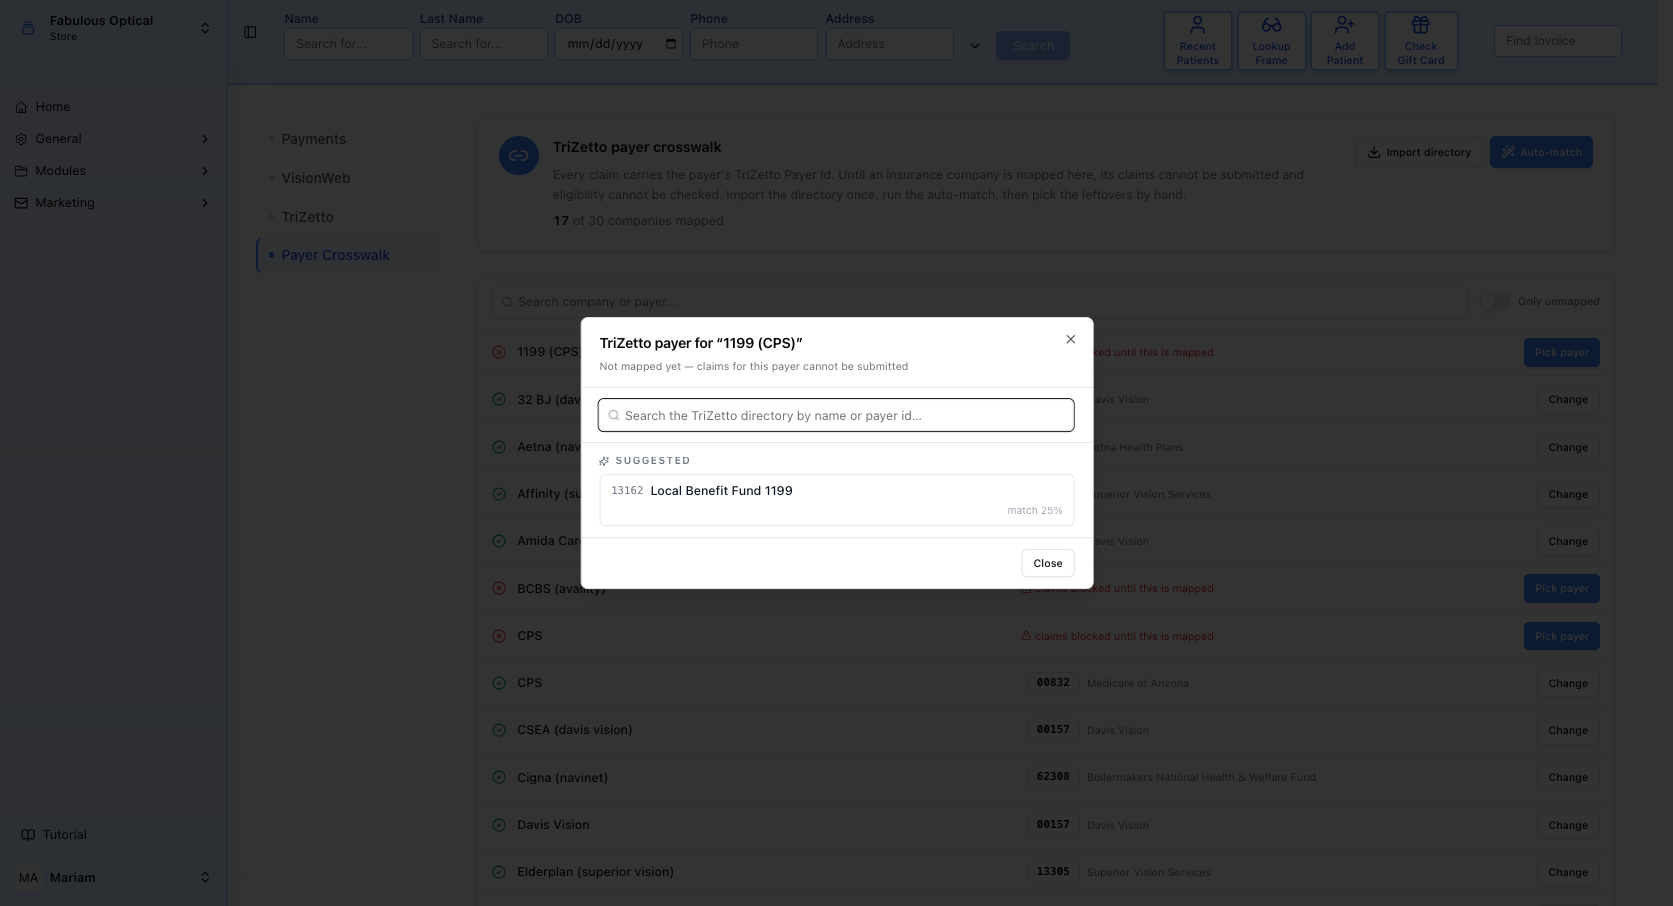
Pick payer opens the directory for that one company. Search by name or payer id, and take the Suggested match when it looks right — the percentage next to it is how confident the matcher is, so a low number is a hint to check rather than a reason to accept. A click on a payer saves the mapping straight away. Change on an already-mapped row does the same thing, and there Clear mapping removes the payer id again.
Watch for insurers that route through a vision plan: 32 BJ (davis vision), Amida Care (davis vision) and Davis Vision itself all map to the same payer id, because Davis Vision is who actually receives the claim. That is correct, not a duplicate.
OptikamPad — fitting measurements
Connects a store to the practice's Optikam Cloud, so the measurements the optician takes on the OptikamPad come into SightHub and can be applied to a lab ticket with one button.
The whole setup is one API key per store, generated in the Optikam Cloud Portal under ACCOUNT | KEYS. Pick the store, paste the key, press Enable. The page has a built-in setup guide; the full walk-through, the sync and the troubleshooting tips are on OptikamPad.