Lab ticket — sending the order to the lab
A lab ticket is the order the lab actually works from: which prescription to grind to, which frame it goes into, and where it ships. It always belongs to an invoice — you make it from the Create Lab Ticket button on the invoice page.
Picking the prescription
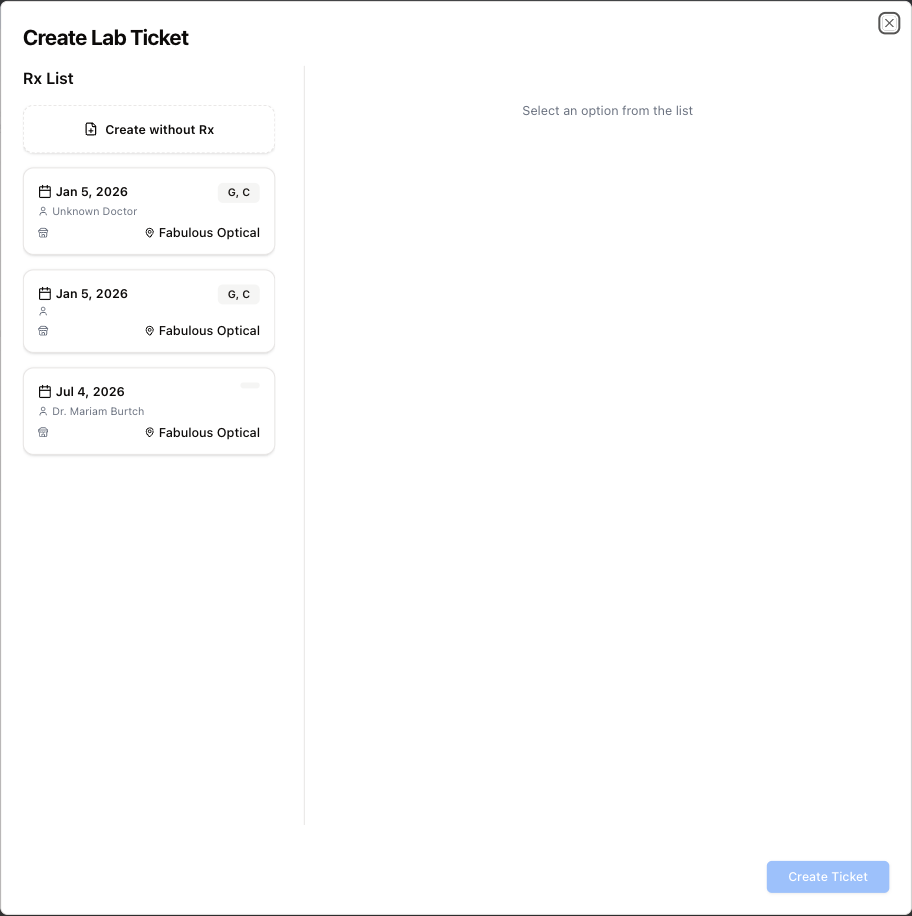
The left side lists the patient's prescriptions, newest first, each with the date, the doctor, the location and a tag saying what it covers — G for glasses, C for contacts, G, C for both.
Create without Rx, the card at the top of the list, starts a ticket with no prescription attached — for when the lab work does not depend on one. Clicking it shows the same Glasses / Contacts choice and, for glasses, the Select Frame list described below.
Checking it before you commit
Click a prescription and it opens on the right so you can confirm you picked the right one:
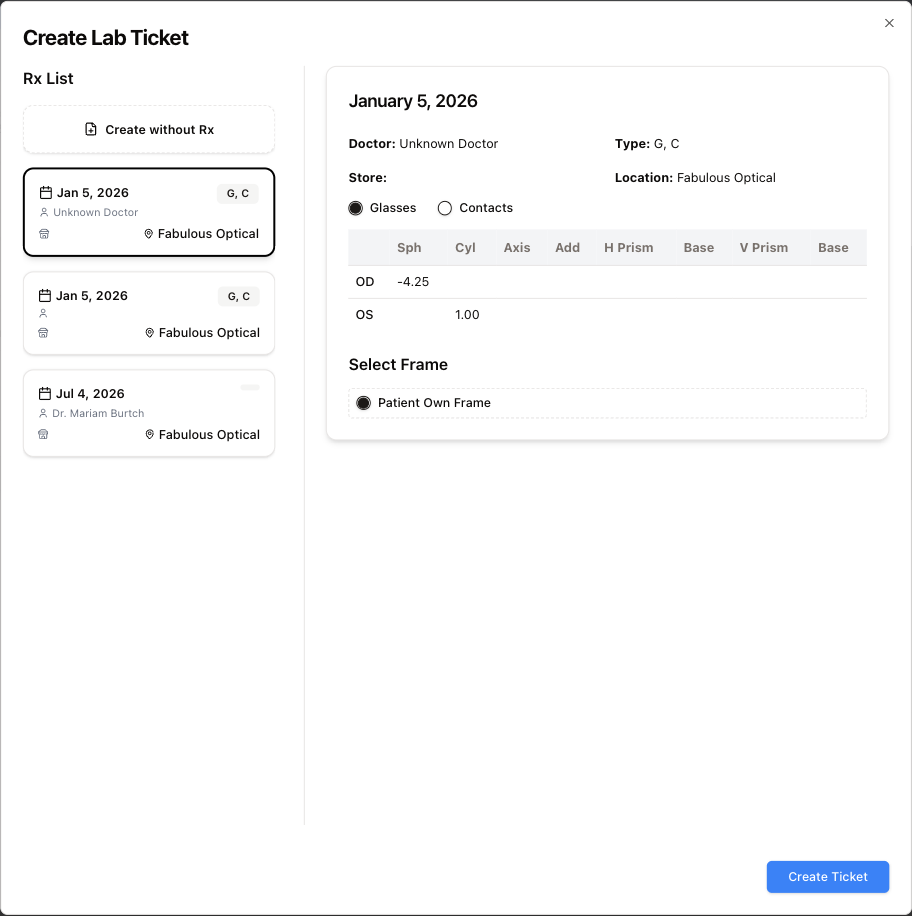
- The header repeats the date, doctor, store, location and type.
- Glasses / Contacts — which half of the prescription this ticket is for. A prescription tagged G, C holds both, and the ticket is for one of them. The choice does not follow the tag: it starts on Glasses even for a contacts-only prescription, so switch it to Contacts yourself.
- The table underneath shows the actual values for OD and OS. For glasses that is Sph, Cyl, Axis, Add, H Prism and its base, V Prism and its base; switch the type to Contacts and it becomes BC, Dia, Pwr, Cyl, Axis, Add and Color.
- Select Frame — which frame the lenses go into, chosen from the frames on this invoice. Patient Own Frame is for when the patient brings their own. This block only appears when the type is set to Glasses. Watch out: Patient Own Frame is selected by default, so if the patient bought a frame on this invoice, pick it — otherwise the ticket goes out as patient's own frame.
Create Ticket makes the ticket. It stays greyed out until you have either selected a prescription or clicked Create without Rx. The type starts on Glasses. To back out, close the window with the ×.
The ticket itself
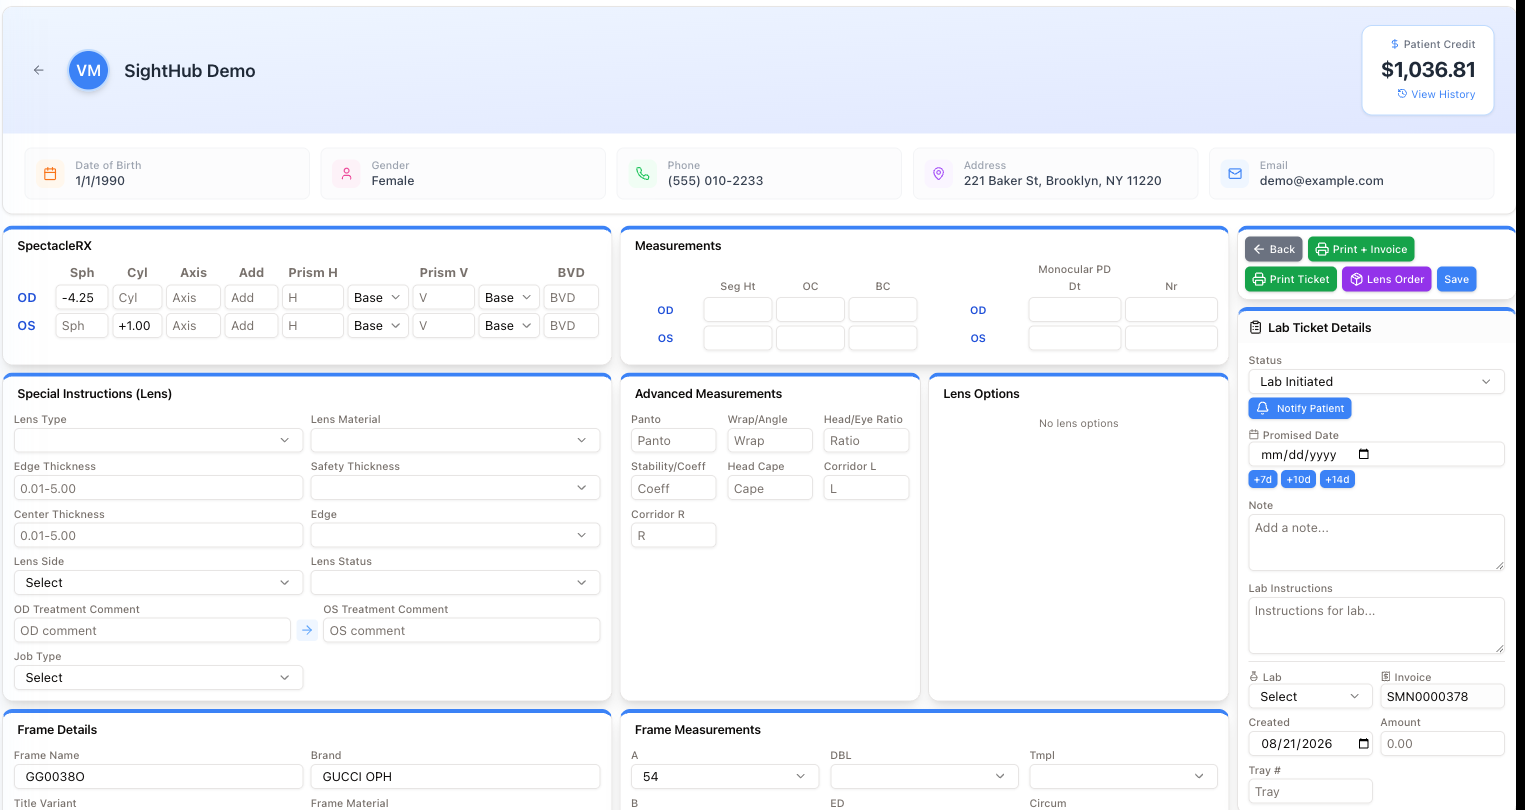
Creating the ticket opens the lab order. The patient strip runs across the top; everything below it is the order.
SpectacleRX and Measurements
SpectacleRX carries the prescription across — Sph, Cyl, Axis, Add, Prism H and Prism V with their bases, and BVD (back vertex distance), per eye.
Measurements holds what the lab needs to position the lens in the frame: Seg Ht (segment height), OC (optical centre), BC (base curve), and the Monocular PD split into Dt (distance) and Nr (near).
Special Instructions (Lens)
The heart of the order — what to actually make:
- Lens Type — Single, Progressive, Cataract, Trifocal, Single Vision SV, Bifocal FT-28, Blended Bifocal, Bifocal FT-35, Roundseg Bifocal R22 / R24, Eyezen / anti-fatigue, Plano, Other.
- Lens Material — CR-39 1.50, Mid Index 1.56, Polycarbonate, Trivex 1.53, High Index 1.60 / 1.67 / 1.74, Glass, and more; + Other adds one that is not listed.
- Edge Thickness and Center Thickness — type the millimetres in (0.01–5.00); the field tidies itself to two decimals when you leave it.
- Safety Thickness — this one is a list, and the entries spell out what they mean: 0.80 Ultra Thin, 1.00 Center, 1.50 Standard, 3.00 Safety, 4.00 Extra Strength, 5.00 High Impact.
- Edge — the finish: Satin Edge Polish, Roll and Polish, Polish Only, Lustre.
- Lens Side — Right, Left or Both.
- Lens Status — Cut, Edged, Ready, Delivered.
- OD / OS Treatment Comment — free text per eye; the arrow between them copies the right eye's comment to the left.
- Job Type — Frame To Come, Uncut, Remote Edge, Lab Supplied. This says who supplies the frame and who edges the lens, so get it right or the lab will send the job back.
Advanced Measurements — Panto, Wrap/Angle, Head/Eye Ratio, Stability/Coeff, Head Cape, Corridor L and R — matter for progressive lenses. Next to them sits a read-only Lens Options table showing what the invoice put on the job.
Set Job Type to Frame To Come, Uncut or Remote Edge and an OMA Trace File upload appears — that is where the frame trace from your edger goes.
Frame Details and Frame Measurements
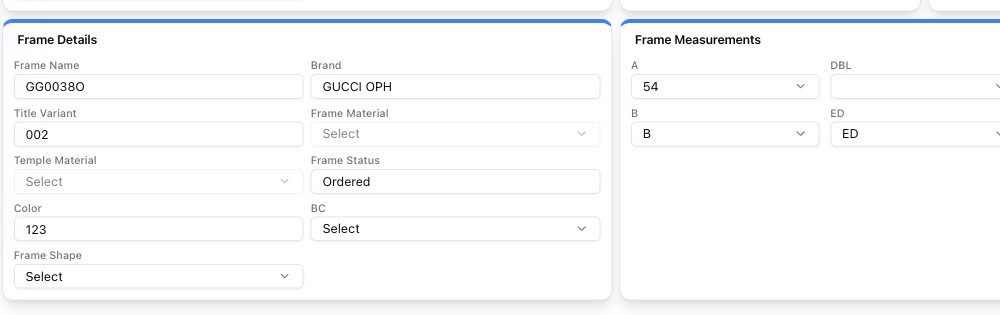
The frame carried over from the invoice: Frame Name, Brand, Title Variant, Frame Material (Titanium, Zylonite / Acetate, Metal/Zyl, Carbon Fiber, Horn …), Temple Material, Color, plus BC, Frame Shape and a read-only Frame Status. When the frame came from the invoice, its name, brand, variant, materials and colour are filled in and locked; on a Patient Own Frame ticket you type them in. Frame Measurements takes the box numbers — A, B, DBL, ED, Tmpl (picked from lists) and Circum (typed).
The right-hand panel
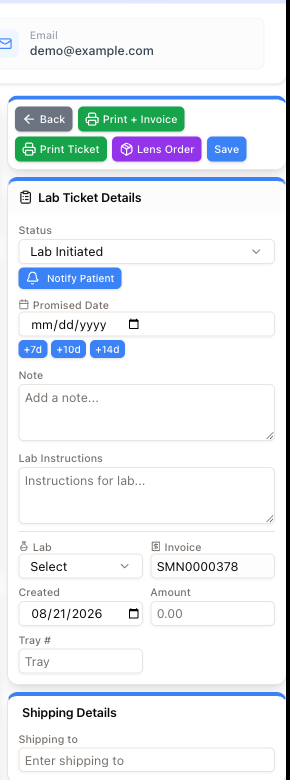
Where the ticket is managed rather than described:
- Status — where the job stands, starting at Lab Initiated. Four statuses mean the job is done — Completed - Ready to pick up, Notifed customer, Dispensed in Store * and Shipped to Customer *: the ticket records the day it reaches one of them, so on the Orders page it counts as completed and stops running late; any other status, a cancelled one too, takes that day off again. Dispensed in Store * and Shipped to Customer * also mean the patient has the frame: one ordered on this invoice that has arrived is sold then. While it has not arrived — still on order, or on its way to the store — the ticket will not save with either of them, and nothing from that Save is kept; receive the frame first.
- Notify Patient — queues a message telling the patient the job has moved. It is not instant: the confirmation reads Patient will be notified in 1 hour.
- Promised Date — with +7d, +10d, +14d shortcuts instead of picking a date by hand.
- Note — internal note; Lab Instructions — text that goes to the lab.
- Lab — which laboratory gets the job. Invoice, Created, Amount and Tray # identify it.
- Shipping Details — a single Shipping to field saying where the finished job goes. Glasses tickets only; a contact lens ticket has no such card.
The buttons above the panel, left to right: Back, Print + Invoice, Print Ticket, Lens Order, Apply Optikam, Save. Print Ticket prints the lab ticket on its own; Print + Invoice adds the invoice's item list to the same printout. Both open a PDF in a new tab. At the right end of the same row sits the ticket's number — Ticket # followed by the number. That is the number to quote to the lab, and the one the optician types into the OptikamPad (see below).
When Save appears to do nothing
On a glasses ticket Save checks the prescription before it sends anything, and if a check fails it stops without any message — the box at fault just turns red. Only Job Type and Lens Side also get a red Required under them. Scroll up and look for the red box. The rules are:
- at least one eye needs a Sph;
- a Cyl cannot be zero, and needs an Axis;
- a prism value cannot be zero, and needs a base direction;
- multifocal lens types need an Add and a Seg Ht on both eyes, and single-vision types must not have an Add;
- Job Type and Lens Side must both be set;
- Prism, BVD and the Measurements boxes (Seg Ht, OC, BC, Dt, Nr) have allowed ranges — a value outside them turns the box red, but the screen does not say what the limit is;
- Panto, Wrap/Angle, Head/Eye Ratio and Stability/Coeff must be plain numbers. This is the one check that does show a message — Panto, Wrap/Angle, Head/Eye Ratio and Stability/Coeff must be numeric values — and those boxes do not turn red.
After the order goes out
Once an order has been sent to a lab, a purple Order Status card appears under Lab Ticket Details: the Order ID, the lab's Status and status code, when it was Received and Confirmed, and an Est. Delivery.
If the lab rejected something, a red Errors list appears in that card with the code and the reason. A rejection that comes back later shows up only there, so it is worth glancing at after submitting.
Apply Optikam — measurements from the OptikamPad
If the practice measures frames on an OptikamPad, the measurements do not have to be typed in by hand. The store needs to be connected first — see OptikamPad.
- Note the Ticket # at the right end of the button row.
- On the pad, the optician enters that number as the order / customer number and takes the measurement.
- Once the measurement has reached SightHub (it is pulled from Optikam Cloud every few minutes), press the teal Apply Optikam button.
SightHub takes the newest measurement for this ticket and writes it in: Seg Ht, Dt and Nr (the monocular PD) and BVD for each eye, plus any frame values the session carries. A message says how many fields it filled — Optikam measurement applied (7 fields).
Only those fields change. Anything else you have typed on the ticket and not saved yet stays where it is — press Save as usual to keep it.
No Optikam measurement for this ticket yet means nothing has arrived for this ticket number. Either the pad session has not been pulled in yet, or the optician typed a different number on the pad.
The button sits in the row shared by both kinds of ticket, so it also shows on a contact lens ticket — but what it brings in are glasses measurements.
Contact lens tickets
Everything above describes a glasses ticket. A ticket made for contact lenses opens a different screen, and the right-hand Lab Ticket Details panel (with the button row) is the only part the two have in common. On a contact lens ticket Save sends the form without the prescription checks above. Two things in that panel currently do not work there: the +7d / +10d / +14d shortcuts do not fill the Promised Date (pick the date in the calendar instead), and the Order Status card does not appear.
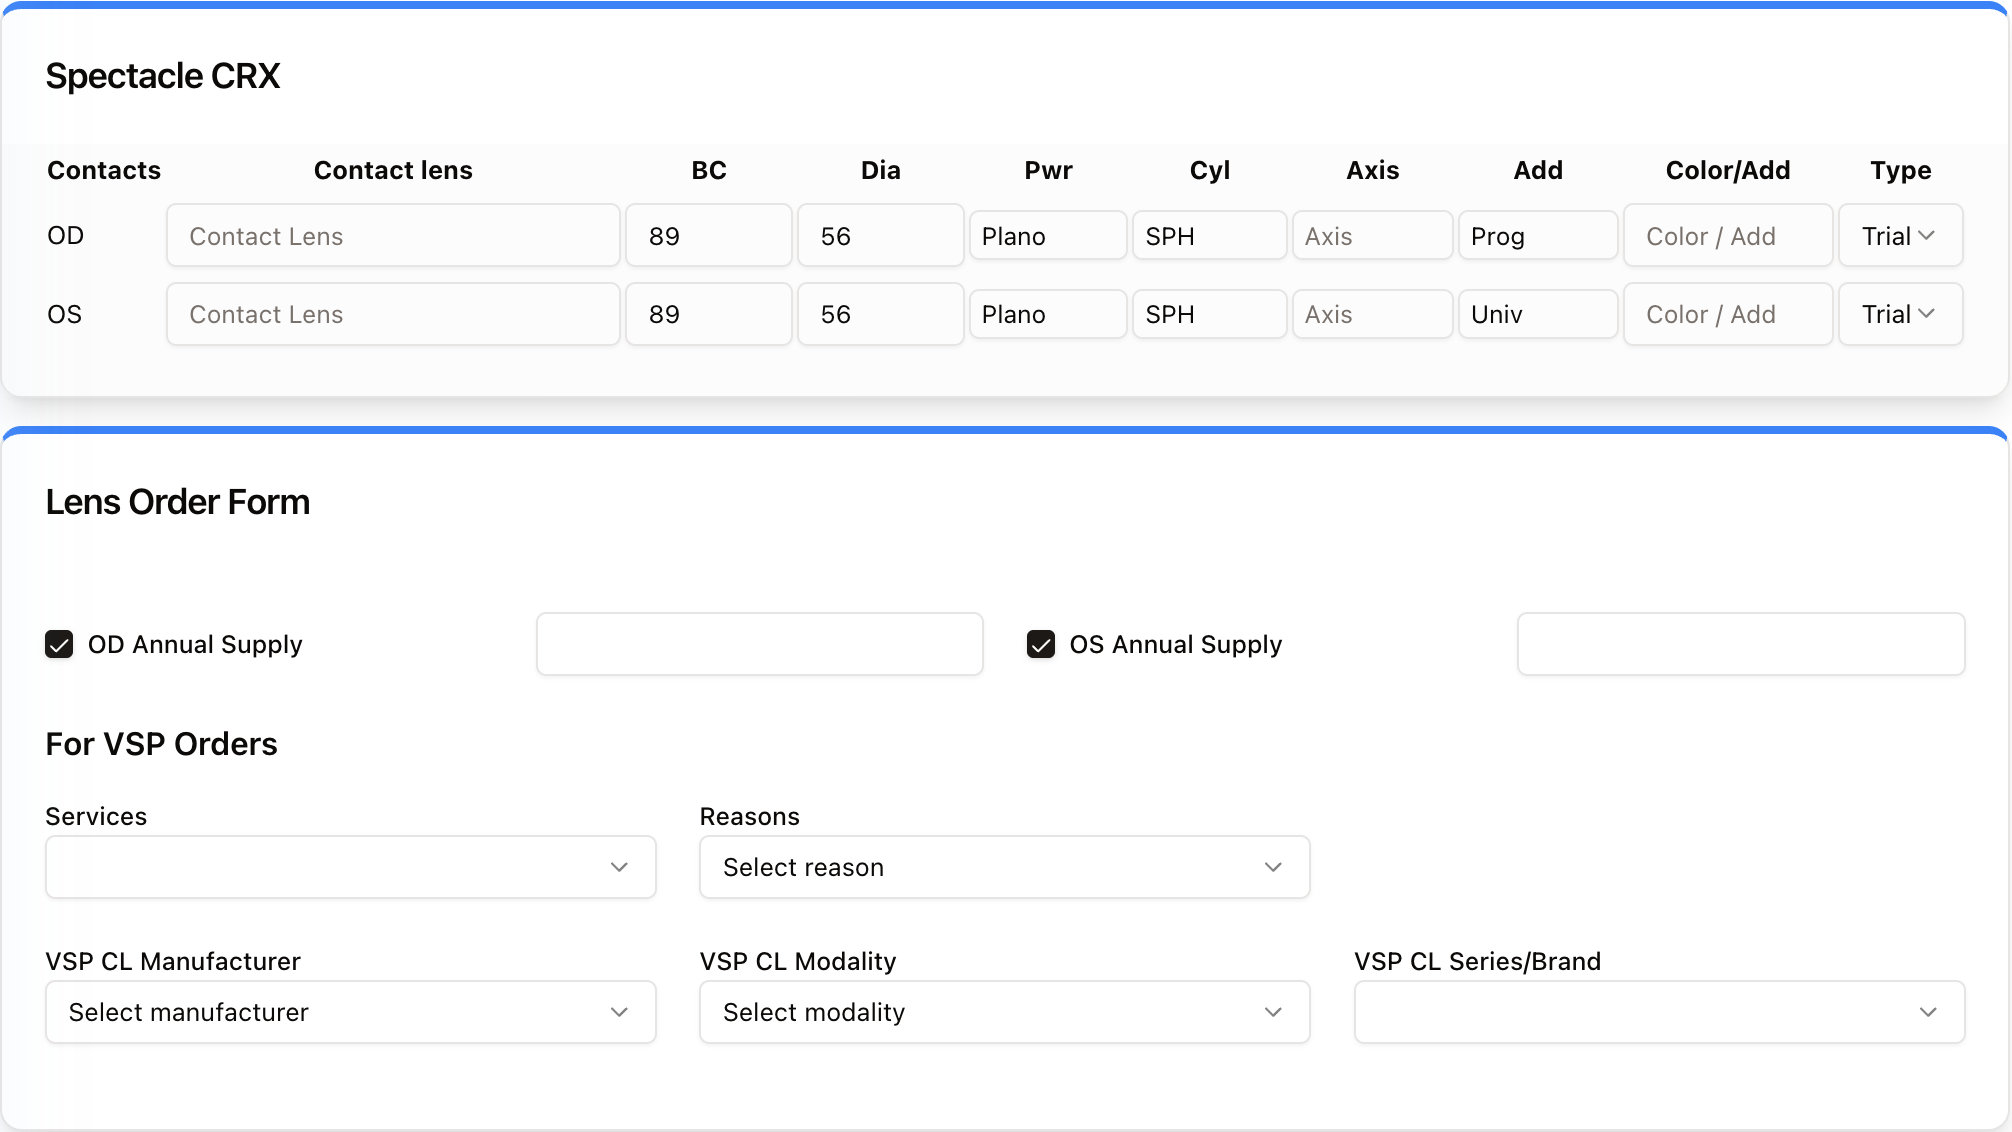
Spectacle CRX at the top is the contact-lens prescription, one row per eye: the Contact lens itself, then BC (base curve), Dia (diameter), Pwr, Cyl, Axis, Add and Color/Add. The Type at the end of each row says whether the row is a Trial pair or the Patient Rx — the lenses actually being ordered.
Below it, the Lens Order Form:
- OD Annual Supply / OS Annual Supply, each with a quantity box. Tick them when the patient is buying a year's worth rather than a single box, and put the total number of boxes in the field beside it.
- For VSP Orders — the block VSP requires and other insurers ignore:
- Services — what is being billed: New lens (New Fit/Refit), Replacement lens, Fitting of contact lens for management of keratoconus, initial fitting, Corneal lens for aphakia — one eye or both eyes, Script and fit contact lens — corneoscleral lens.
- Reasons — Elective Contact Lenses or Necessary Contact Lenses. This is the word that decides how VSP treats the claim, so it is worth getting right rather than leaving blank.
- VSP CL Series/Brand — the lens itself, from the practice's own list: ACUVUE, ALCON, B&L, Cooper Vision, Specialty Contacts and any you have added.
- VSP CL Manufacturer and VSP CL Modality sit next to it but have nothing in them yet — they open empty and cannot be filled.
Fill in only what the claim needs; a private-pay contact lens sale can leave the VSP block empty.
Lens Order — ordering the lenses electronically
Lens Order does not open a form to fill in. It opens a checklist: SightHub reads the ticket and the invoice, works out whether the job can be sent to the lab electronically, and shows you what is still missing.
What you see depends on the answer.
When it can be sent. The dialog is titled after the provider — Zeiss Order or VisionWeb Order — and lists the fields the lab requires, two columns of small cards. A green tick means the field is filled; a red cross means Missing. Optional Fields are listed underneath in grey.
The line under the title counts the problem for you: All required fields are filled. Ready to submit., or 3 required field(s) missing. Submit Order at the bottom stays disabled until nothing is missing — so you cannot half-send a job.
If the lab is Zeiss and nobody has signed in yet, an amber strip appears — Zeiss authentication required — and Login to Zeiss takes the place of Submit Order. It takes you to the Zeiss sign-in page and then back to this ticket; press Lens Order again to continue.
When the order goes through, a message confirms it with the lab's order number and status, and the Order Status card appears. If the job was already sent earlier, you get Order already submitted with that order's number instead of a second order. Cancel closes the checklist without sending anything.
When it cannot be sent. The dialog says so plainly:
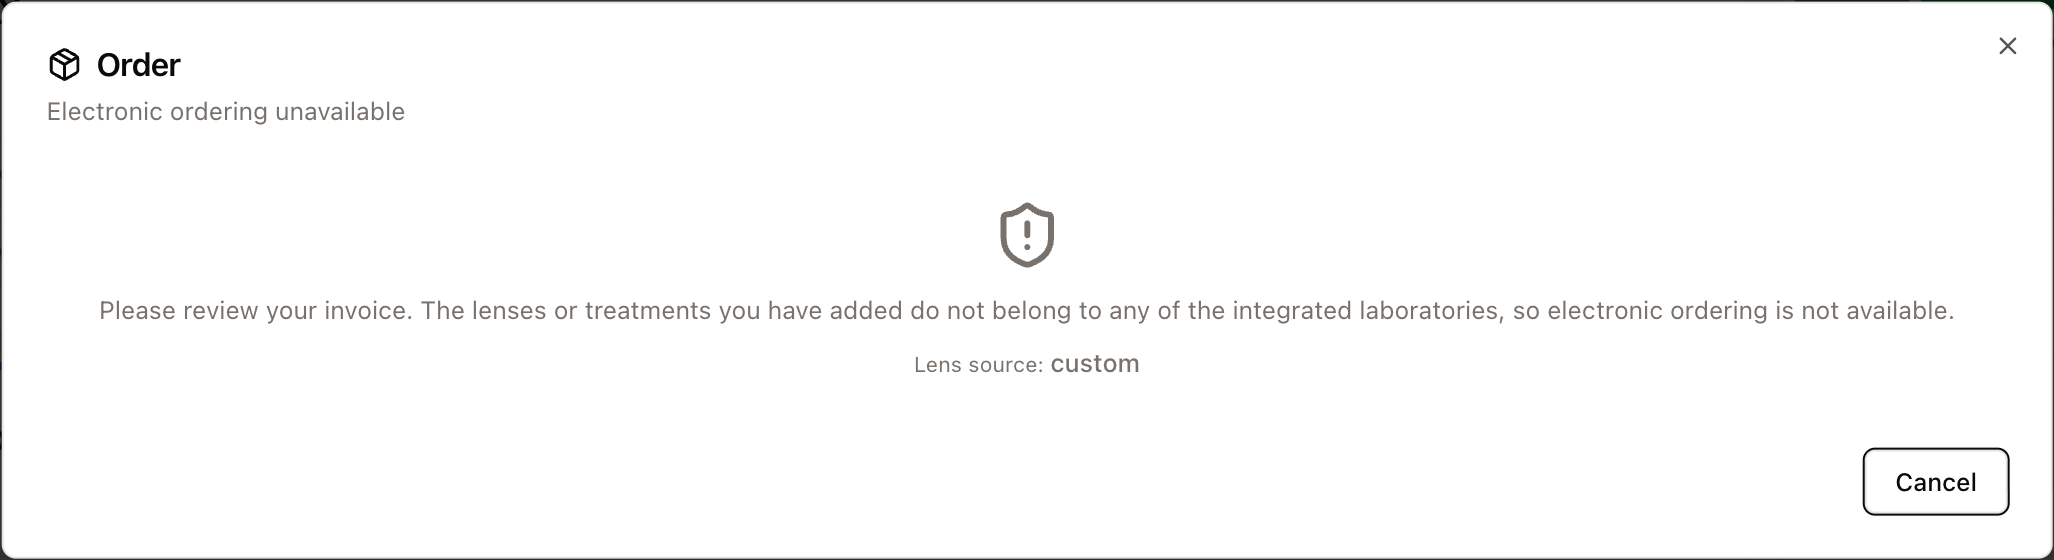
Electronic ordering unavailable
Please review your invoice. The lenses or treatments you have added do not belong to any of the integrated laboratories, so electronic ordering is not available.
The Lens source line at the bottom of that dialog names why: custom means the lenses were typed in by hand rather than taken from an integrated lab's catalogue.
That message is about the invoice, not the ticket. It appears when the invoice has no lens lines at all (a frame-only sale), or when the lenses on it come from a lab that is not integrated. Add the lens to the invoice from an integrated lab's catalogue, or send the job with Print Ticket instead.
Electronic ordering also needs the store to be connected to the lab in the first place — see Integrations.