Receipts, transfers and returns
Stock arrives, stock moves, stock goes back. Of the three menus at the top right of Inventory, this page covers Receipts (From vendors, From stores, Transfer) and Returns (From Patients, To vendors). Stock — search and count sheets — is described in the Inventory overview.
First, a trap worth knowing
These pages can open showing nothing at all — No Invoices, No Transfers — while the records are sitting there perfectly well. The date boxes come up filled with the current month, and one press of Submit with those dates in place hides anything older.
So before concluding a section is empty: set From (on some pages From Date) back far enough, then Submit.
Receipts from a vendor
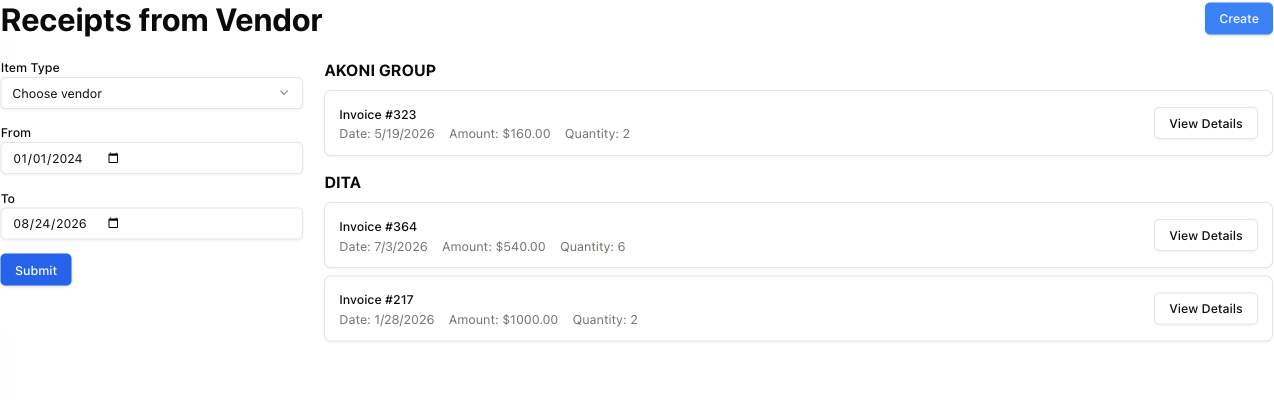
Deliveries are grouped by vendor, newest first. Each card gives the invoice number, the date, the amount and the number of pieces. Item Type narrows the list to one vendor; From / To set the period.
Create starts a new receipt.
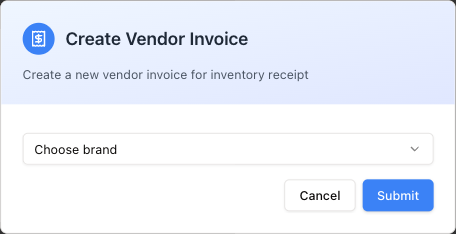
The dropdown says Choose brand, but it lists vendors — pick the supplier who sent the delivery. Press Submit and an empty vendor invoice is created for you to fill in from the box in front of you.
Deliveries are booked in where the store receives them. A store with a warehouse receives at the warehouse — vendor deliveries, and transfers from other stores — and the showcase gets its stock from there; only a store with no warehouse receives at its showcase. At a showcase whose store has a warehouse, a new receipt, Add Product and receiving a pending order are refused, and the message names the warehouse: book the delivery in there, then transfer it to the showcase.
The receipt itself
View Details opens the receipt, which has two tabs: Details and Receipt Items.
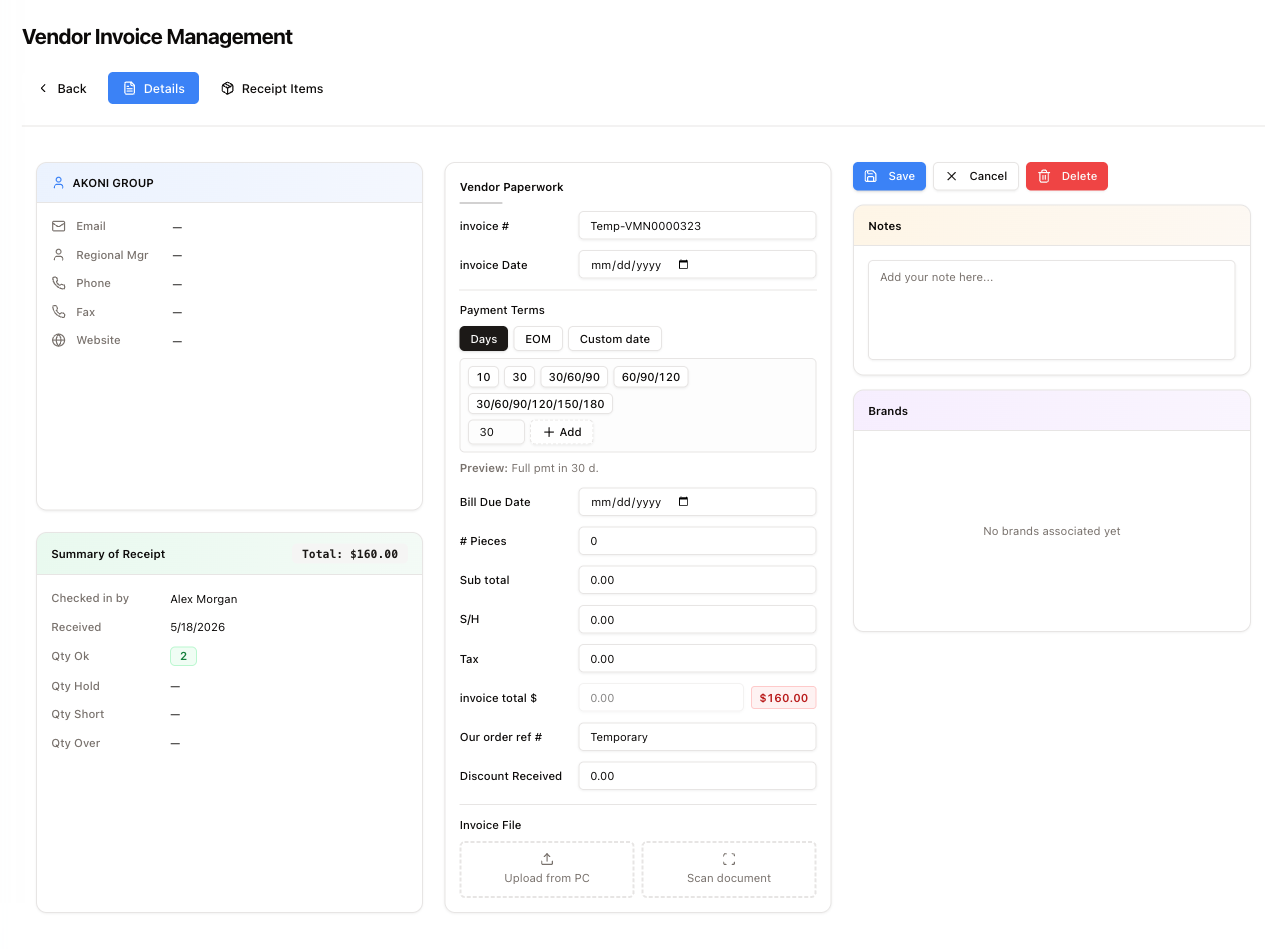
Details is the paperwork, and it is arranged as three columns.
On the left, the vendor — the contacts SightHub holds for them — and underneath, the Summary of Receipt: who checked the delivery in, the date it was received, and the four counts that matter:
| Count | Meaning |
|---|---|
| Qty Ok | Arrived and matched the paperwork |
| Qty Hold | Arrived but held back — damaged, wrong, needs a decision |
| Qty Short | On the invoice but not in the box |
| Qty Over | In the box but not on the invoice |
Those four are the whole point of receiving stock in the system rather than on paper. A short or over count shown here is a claim you can still make with the vendor a month later. This card is read-only — there are no boxes on this page to type the counts in.
Qty Ok counts every piece booked in on this receipt, an ordered frame received on it included. A piece sold or moved on since still counts — it did arrive — while one deleted from the receipt does not. Qty Over is how many of them go beyond the paperwork's # Pieces.
The middle column is Vendor Paperwork — the invoice number and date, the totals, your own order reference, and any discount received.
The invoice date is required: without it the paperwork is not saved, because a vendor invoice with no date never reaches Accounting. Discount Received fills itself in — the sum of the discounts on the pieces booked in on this receipt. A different figure typed by hand is kept; 0, or the figure shown, goes back to the pieces' sum.
You type Sub total, S/H and Tax; invoice total adds them up for you and cannot be edited. The badge beside it compares that figure with what the items booked in actually come to: green when they agree, red when they do not. A red badge means something is missing from the item list, or one of the typed figures is wrong. The bill that reaches Accounting is the receipt's own figure — the items booked in, less the receipt's discount — plus S/H and Tax, not the typed Sub total.
Payment Terms is worth a moment. Pick Days, EOM (end of month) or Custom date. Under Days, click one of the presets — 10, 30, 30/60/90, 60/90/120, 30/60/90/120/150/180 — or type your own number of days; Add gives you another period box for split terms. EOM asks for a Percent and Days after EOM; Custom date asks for a single Payment date. The Preview line underneath reads back what you chose in plain words: Full pmt in 30 d.
Clicking one of the Days presets also fills in Bill Due Date for you: the invoice date (or today, if no invoice date is set yet) plus the longest period of the preset. Typing your own number, or choosing EOM or Custom date, does not — but a Bill Due Date left empty is filled in from the terms when you Save: the invoice date plus the longest period (Days), the end of the invoice's month plus the days after it (EOM), the payment date (Custom date), or the invoice date itself with no terms. A date already in the box is kept as it is. It matters: that date is what the Accounting page ages the debt against.
Invoice File takes the supplier's paper (a PDF or an image): Upload from PC, or Scan document to pull it straight off a connected scanner. The file is only stored when you press Save.
On the right sit Save and Delete, and a Notes box for anything the next person should know. Save stores the paperwork, the file and the note together. Delete removes the whole receipt at once — there is no "are you sure?" step. (Cancel next to them is not wired up — it does nothing, so use Back if you want to leave without saving. The Brands card below is a placeholder too, and always says No brands associated yet.)
Receipt Items
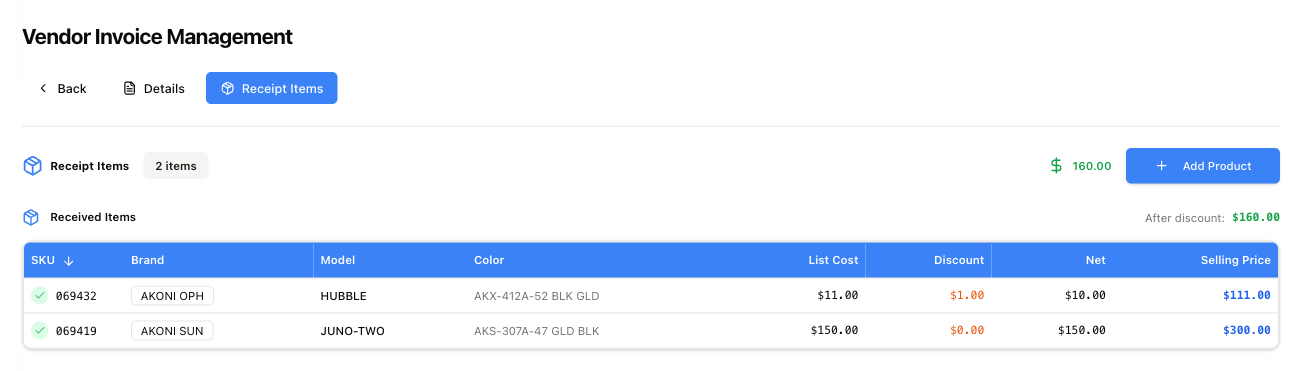
Every piece that came in, one row each: SKU, Brand, Model, Color, then the money — List Cost, Discount, Net, and the Selling Price the pricing formula worked out from it (filled in when the list cost is typed; it can be typed over).
The figure at the top right, next to Add Product, is the receipt total; After discount in the Received Items header is what the practice actually pays. (The green tick on each row is decoration, not a status.)
Clicking a row opens Frame Details with the item's figures and a Delete button, for a line booked in by mistake. Delete works only on a piece as it arrived — nothing done to it since (counted, sold, moved…); otherwise SightHub refuses and says what happened to it. The piece is not erased: it is marked Deleted and drops off the receipt — its count, its totals and the bill — while its history keeps both the arrival and the deletion. An ordered frame deleted this way goes back to Pending Orders.
When something has been ordered from this vendor and not yet arrived, a second table, Pending Orders, appears above the received items. Click a line there to receive it when it turns up. The table holds the whole store's orders: one placed at the showcase shows at the warehouse too. A frame received from it is booked in like any other piece — counted on this receipt, in stock — and kept for the patient whose sale ordered it until it is handed over. Received at the warehouse for the showcase, it goes straight on to the showcase on a transfer, and the showcase receives it under Receipts → From stores.
Add Product adds another line — that is how a Qty Over piece gets into stock. The label for each new piece is sent to the label printer straight away; if the printing helper on this computer is not running, a setup window opens instead.
If the Selling Price you enter differs from what the same frame already sells for in stock, a Selling Price Changed window opens before the line is added. It offers one Reprint stickers task per location that holds the old price (Create N Tasks & Add Product), or Just Add Product — No Tasks — see Tasks.
Receipts from a store
Receipts → From stores is the same idea for stock arriving from another location of the practice rather than from a supplier: choose the store, choose the dates, press Submit.
It only shows what the other side has already sent. If a transfer has not appeared, it has not been sent yet.
Each card shows who it is from, the amount, what is still Due, the quantity and the status. View Details opens the receipt: every piece still on its way has a Receive button — press it as the piece is unpacked, and it gets a green tick. Paid at the bottom marks the receipt as paid.
A piece on its way already belongs here: it shows in this location's stock as in transit (ICT (sent and not received)) and is gone from the sender's, but it cannot be sold or changed until it is received. Received, it takes back the status it left with — a Defective frame stays Defective. The receipt's status turns Received once nothing on it is still on its way. At a store with a warehouse, transfers from other stores arrive at the warehouse; the showcase receives what its own warehouse sends it.
Transfer
Moving stock between the practice's own locations.
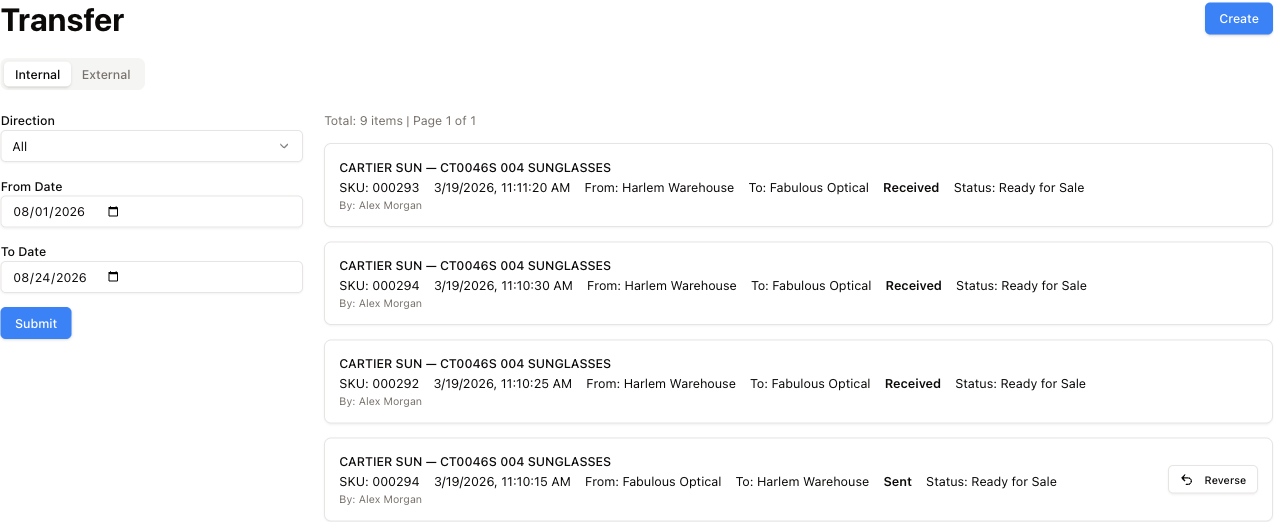
Each line is one item on the move: what it is, its SKU, when it moved, From where To where, whether it is Sent or Received, its stock status, and who did it. Direction filters to just the sent or just the received.
The line above the list shows the total and the page, e.g. Page 1 of 3. Only the first page is shown and there is no button for the next one — if you need older moves, narrow From Date / To Date or pick a Direction, then Submit.
Reverse — undoing a transfer
Every Sent line on the Internal tab — the outgoing side of a move — carries a Reverse button. It is the undo for an item sent to the wrong place. Received lines have no button; reverse the move from its Sent line.
- Press Reverse on the line.
- The Reverse Transfer window asks Are you sure you want to reverse this transfer? The item will be returned to its original location. and repeats the SKU, the Product and the From → To route, so you can check it is the right piece.
- Press Reverse to confirm, or Cancel.
Transfer reversed successfully means the item is back where it started, and the list refreshes. If SightHub refuses, the red message gives the reason — in that case transfer the item back as a new move.
Creating a transfer
Create starts a transfer.
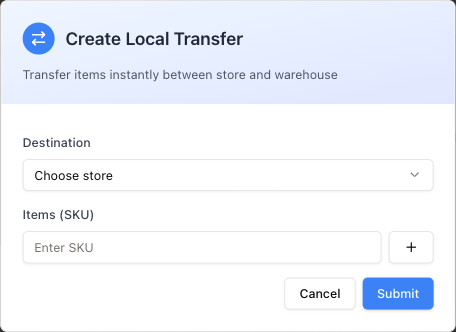
What Create opens depends on the tab you are on. On Internal: pick the Destination, then type or scan each SKU and press + (or Enter), and finish with Submit. As the dialog says, a local transfer happens instantly — there is nothing for the other side to accept.
The External tab
The External tab is for moving stock between stores, as opposed to the store-and-warehouse moves on Internal. It is not instant. Create on this tab asks only for the Store and opens a new transfer invoice. Add the items to it by serial number, then press Send; the other store then receives them under Receipts → From stores. Delete on the same page drops the whole transfer at once, with no confirmation.
Each piece added to a transfer is on its way at once: it leaves this location's stock and shows at the other end as in transit until it is received there. Taken off the transfer before that, it comes straight back as it left. Sent to the showcase of a store with a warehouse, the transfer goes to that warehouse. The tab's Store filter picks Local — transfer invoices between your store's own showcase and warehouses, such as an order the warehouse received and sent on to the showcase — or Foreign, those with other stores.
(Its empty state says No Count Sheets. That is a wrong label in the app — count sheets have nothing to do with transfers.)
Returns to a vendor
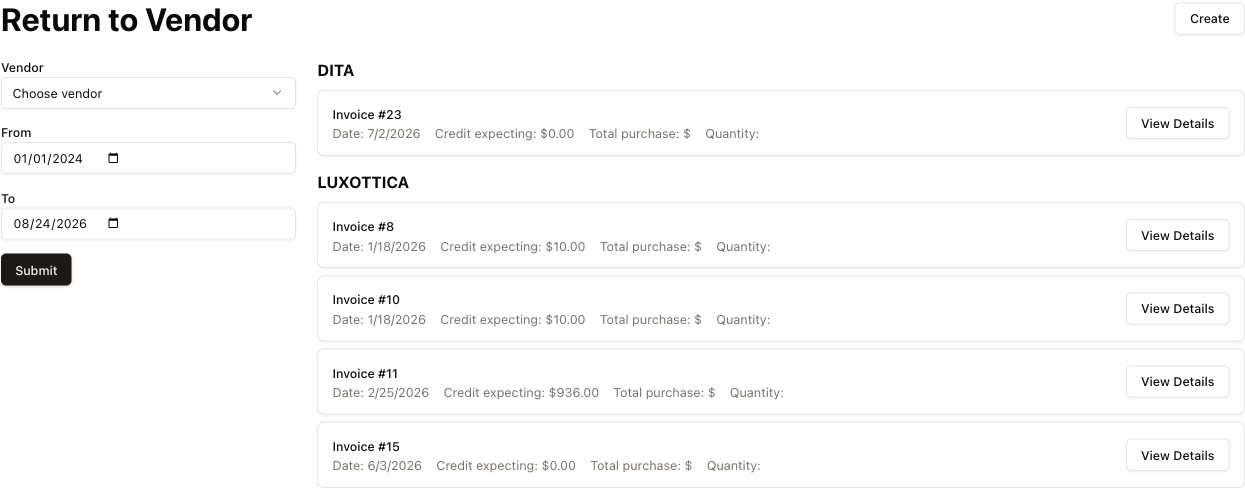
Returns are grouped by vendor, like receipts. Each card shows the return's date, the Credit expecting — the money the supplier owes back once they accept it — the total purchase value and the quantity. The list is the store's: its showcase and its warehouses see the same returns.
Create opens Create Return to Vendor: type a Serial No, pick a Reason (Defective or Not for Sale), press +, and repeat for each piece. The vendor's own return paperwork (number, date, amount, Credit Expecting, a PDF or image) can be added now or later. Create Invoice stays greyed out until at least one item is on the list; it then opens the new return.
Left empty, Credit Expecting is the net cost of the pieces going back — what the practice paid for them — and follows them as pieces are added; a figure typed in its place is kept. A piece on its way between locations, or a frame kept for a patient's order, cannot go on a return.
View Details opens a return. There you can add more items, change the status, credit amount, shipping service and tracking number (Save Changes), and use Record Payment each time the supplier pays the credit back.
That expected credit is what the Accounting page nets off against what the practice owes.
Returns from a patient
Returns → From Patients lists goods brought back by patients. The date boxes on this one do not currently reach the server, so it shows the whole history whatever you put in them.
These are not started here — a patient return begins on the invoice, with the Returns button. This page is the inventory-side view of the same events: what came back, from which patient, and when, grouped by return date. View Details opens the patient's invoice.