Doctor and admin reports — who did what
Ten reports that answer questions about people and actions rather than money: which doctor saw whom and what they billed, what was changed after the fact, who signed in, what has been deleted, and who looked at a patient's record.
They matter most when something is disputed — a record that does not look the way someone remembers it, a file nobody can find, or a question about who opened a chart.
Doctor Reports
Exams Report
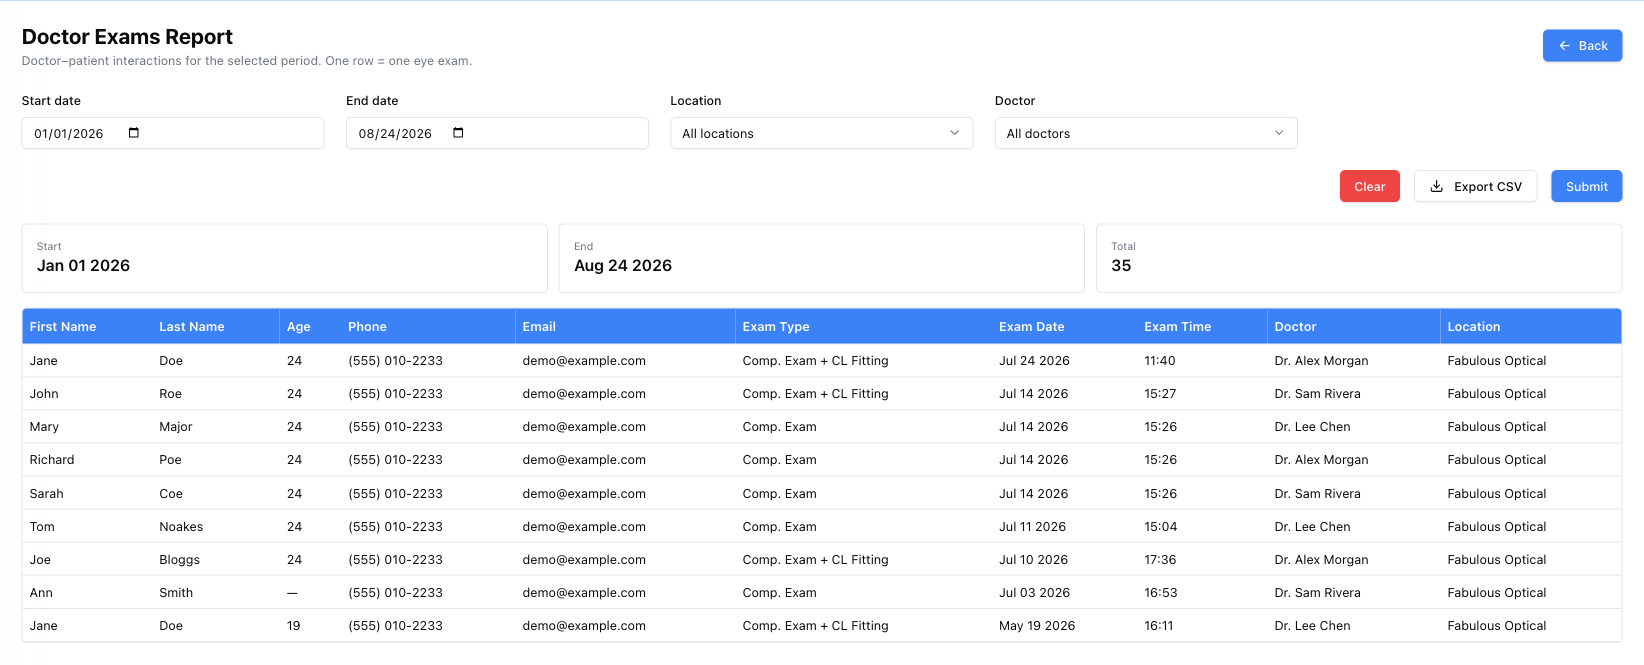
The page is titled Doctor Exams Report. Start date and End date open on the first of this month to today; the Doctor list follows the Location you pick.
One row per eye exam in the period: the patient's name, age and contact details, the Exam Type, the date and time, the Doctor and the Location. Filter by location, by doctor, or both. The cards above the table give the period and the Total.
It is the answer to how many exams did we do last month, and who did them. Export CSV for anything further.
Exam Changes
Every exam that has been edited after it was first written.
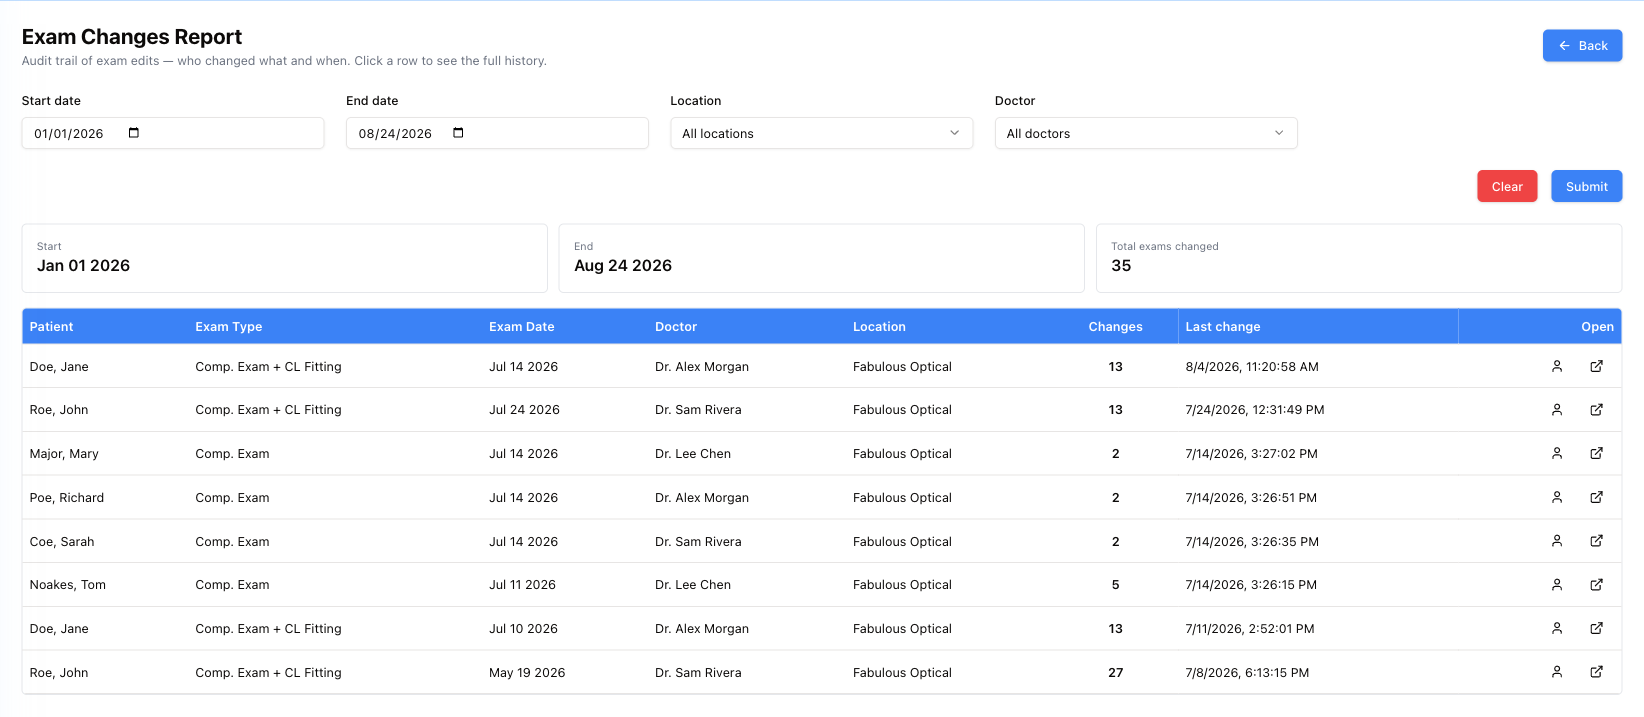
Filter by Start date, End date, Location and Doctor. You get one row per exam, with a Changes count and the timestamp of the Last change. An exam with thirteen changes is worth a look; one with two is normal correction.
Click the row and the whole history opens.
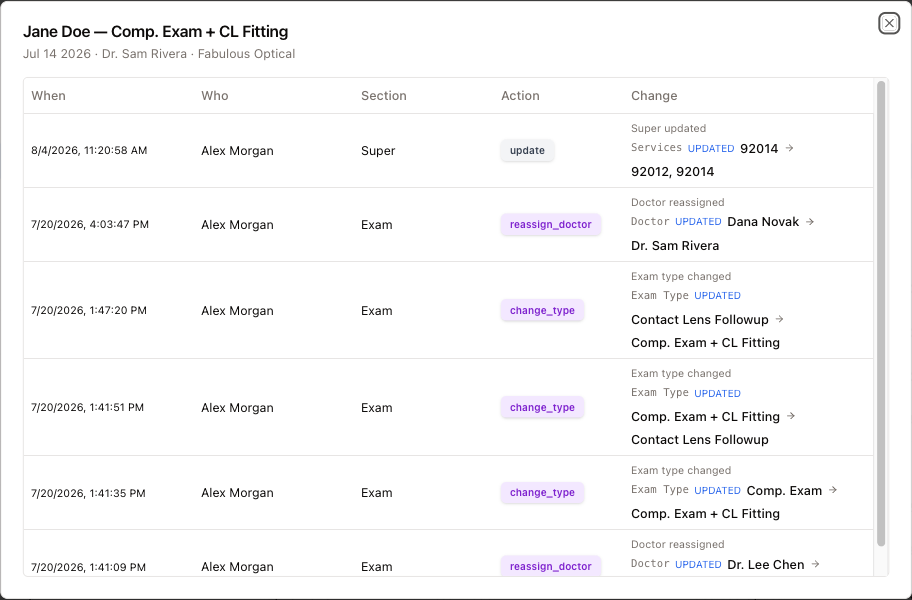
Each entry gives When, Who, which Section of the exam, the Action, and the change itself — the old value, an arrow, the new value.
The actions speak plainly: update, change_type, reassign_doctor, unlock. So a row reading Doctor · UPDATED · Dana Novak → Dr. Sam Rivera is exactly what it looks like: someone reassigned that exam to a different doctor, and their name is next to it.
Two buttons at the end of a row: Open patient goes to the chart, Open exam goes to the exam itself.
This is the report that makes an exam record defensible. Nothing is edited silently.
Doctor Productivity
What each doctor actually billed: the procedure codes they put on super bills, how many exams used each code, and which diagnoses went with them.
Managers only. If you are not allowed, pressing Submit shows a yellow Managers only notice: "This report is available to Admins who also hold the Manage Employees permission."
To run it:
- Start date and End date open on the last 30 days. Change them if you need another period.
- Location — All locations or one store.
- Doctor — All doctors or one. The list follows the location: pick a store first and only that store's doctors are offered.
- Press Submit.
Five cards sit above the table: Start, End, Rows, Doctors (how many doctors appear) and Procedures billed (the total count of codes billed).
One row is one doctor + one procedure code:
| Column | What it shows |
|---|---|
| Doctor | The doctor's name, shown once at the top of their group; the rows under it carry a ditto mark (〃) |
| Procedure | The CPT / HCPCS code |
| Description | What the code is |
| Exams | How many exams in the period billed that code |
| Diagnoses | The diagnoses paired with that code, each as a small tag with a count beside it |
Read it doctor by doctor. A doctor who bills the same exam code with very different diagnoses from colleagues, or who never bills a code everyone else uses, is the start of a conversation about coding. There is no CSV on this report.
Admin Reports
All seven admin reports work the same way: Start date and End date (both open on today), Submit, Clear, and Export CSV once the report has run. Cards above the table give the period and a count.
Login Audit
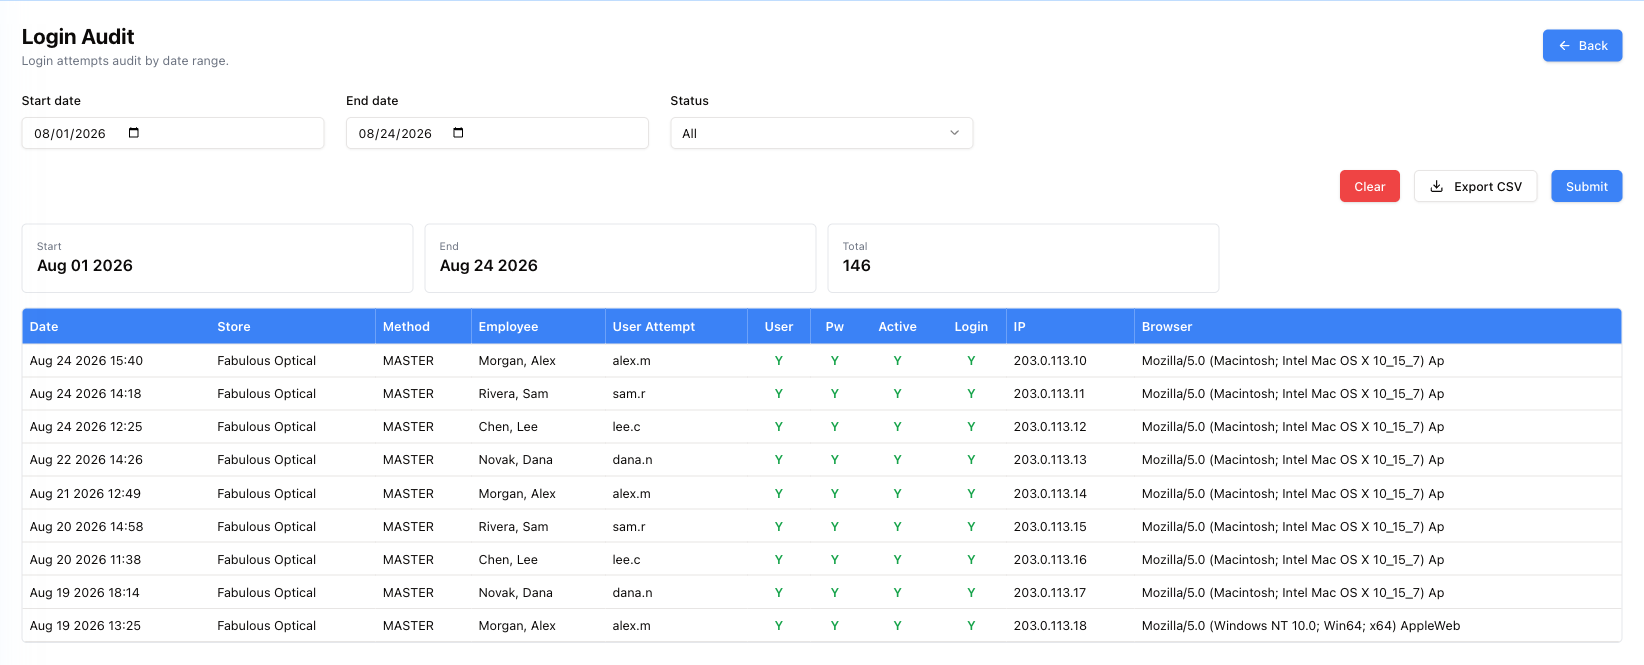
Every sign-in attempt: Date, Store, the Method used, the Employee, the username that was typed (User Attempt), the IP and the Browser.
Then four flag columns, and this is where the report earns its keep:
| Flag | Y means |
|---|---|
| User | The username exists |
| Pw | The password was right |
| Active | The account is active |
| Login | The sign-in actually succeeded |
A grey U means the system could not tell either way.
Read them together. User Y, Pw N repeated from one IP is somebody guessing a password. User Y, Pw Y, Active N is a real member of staff whose account has been switched off and who is now stuck. User N is a username that does not exist at all.
The only filters are Start date, End date and Status — set Status to show just the failures. There is a Store column but no store filter, so filter that in a spreadsheet if you need to.
Deleted Exams
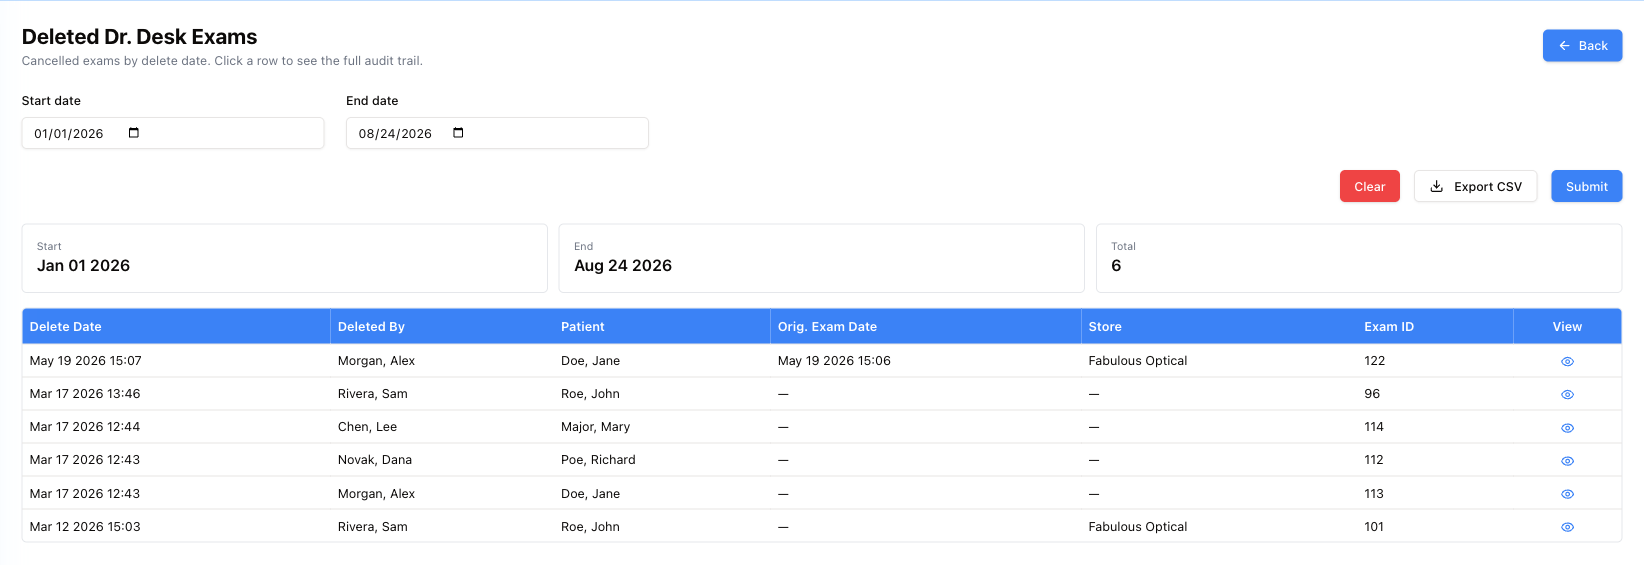
The page is titled Deleted Dr. Desk Exams: cancelled exams, by the date they were deleted.
Each row gives the Delete Date, who deleted it (Deleted By), who asked for the deletion (Requested By), the Reason they gave, the manager who Approved By, the Patient, the Orig. Exam Date, the Store, the Request #, the Patient ID and the Exam ID.
Deleting an exam now needs a reason and a manager's approval, so these three columns tell the whole story: who wanted it gone, why, and who agreed. A dash means the information was not recorded — typically an older deletion.
Click a row (or the eye at the end) and an Exam Audit Trail window opens for that exam. Cards at the top repeat who requested, the reason, who approved, who deleted, when and at which store, plus the number of Entries. Below them is every change made to the exam before it was removed: Time, Section, Action, Field, Old Value, New Value and the Employee.
Deleted Invoices
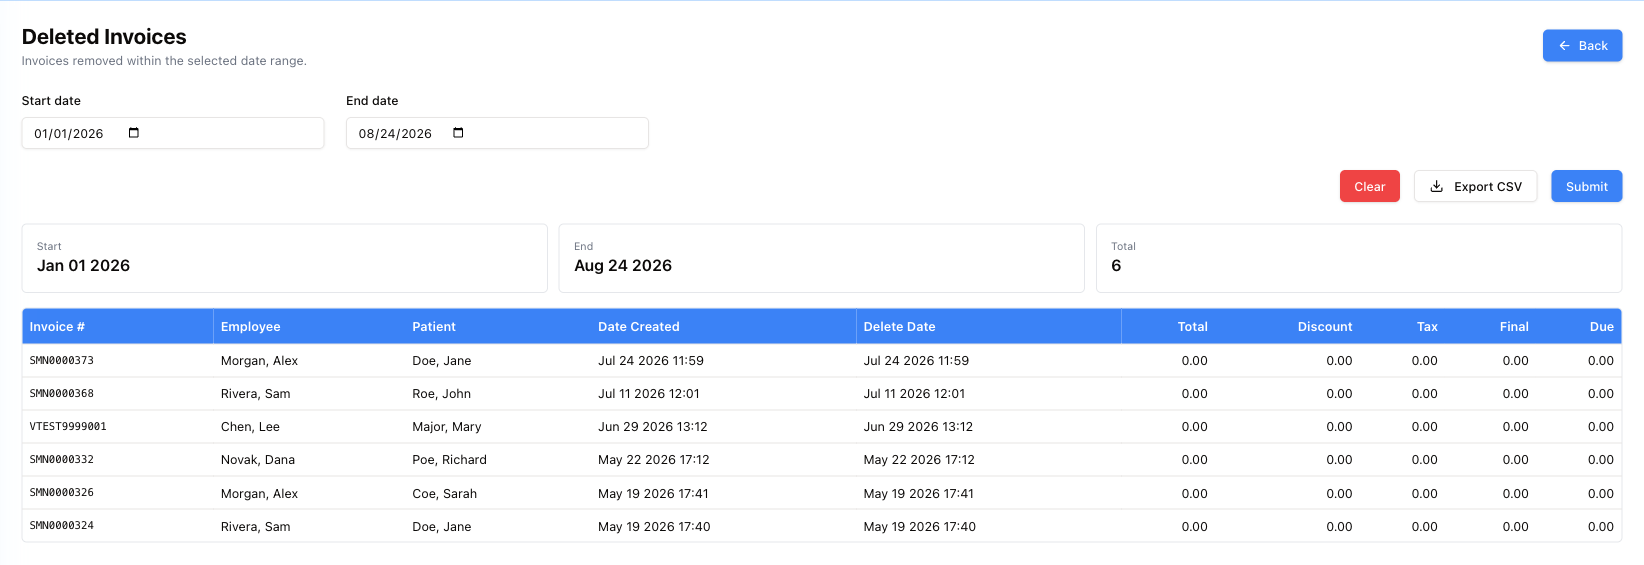
Invoices removed in the period: the Invoice #, the Employee who deleted it, Requested By, Reason, Approved By, the Patient, when it was created (Date Created) and when it was deleted (Delete Date), the money that was on it — Total, Discount, Tax, Final, Due — and the Request # and Invoice ID.
An invoice created and deleted within minutes is usually a mistake being tidied up. One created weeks ago, with money on it, deleted today, is a question — and the Reason column now gives you the answer that was given at the time.
Click a row to open the Invoice Audit Trail (see below).
Deleted Invoice Lines
The page is titled Deleted Invoice Lines and Payments. Deleting a whole invoice is one thing; taking a single frame or a single payment off an invoice is quieter, and this is where it shows up.
One row per removed line or payment:
- Delete Date, the Employee who removed it, the Invoice #, Store and Patient.
- Kind — a blue Line badge for an item, a purple Payment badge for a payment.
- What it was at the moment it was removed: Serial, Item, Desc, Qty, Price, Discount and Amt. Payments have no price or discount, so those show a dash.
- Reason — the reason the person gave when deleting.
Older deletions show No details saved for this delete across those columns — at the time, only the invoice, who and when were kept.
The line itself is gone from the invoice, so click the row to open the Invoice Audit Trail and see it in context.
The Invoice Audit Trail window
Opens from a row in Deleted Invoices or Deleted Invoice Lines. The title gives the invoice number and patient; cards show the Invoice ID, Invoice # and the number of Entries.
The table lists everything that happened to that invoice: Time, Section (Invoice, Line, Payment, Return or Request), Action, Field, Old Value (red), New Value (green), Note and Employee.
Two kinds of entries are mixed together. Field changes — filled, updated, cleared — show one value changing. Everything else — create, delete, approve, decline, cancel and so on — is an event in the invoice's life, and those rows are shaded grey so you can follow the story at a glance. A Request entry is the deletion request and the manager's decision on it.
Deleted Files
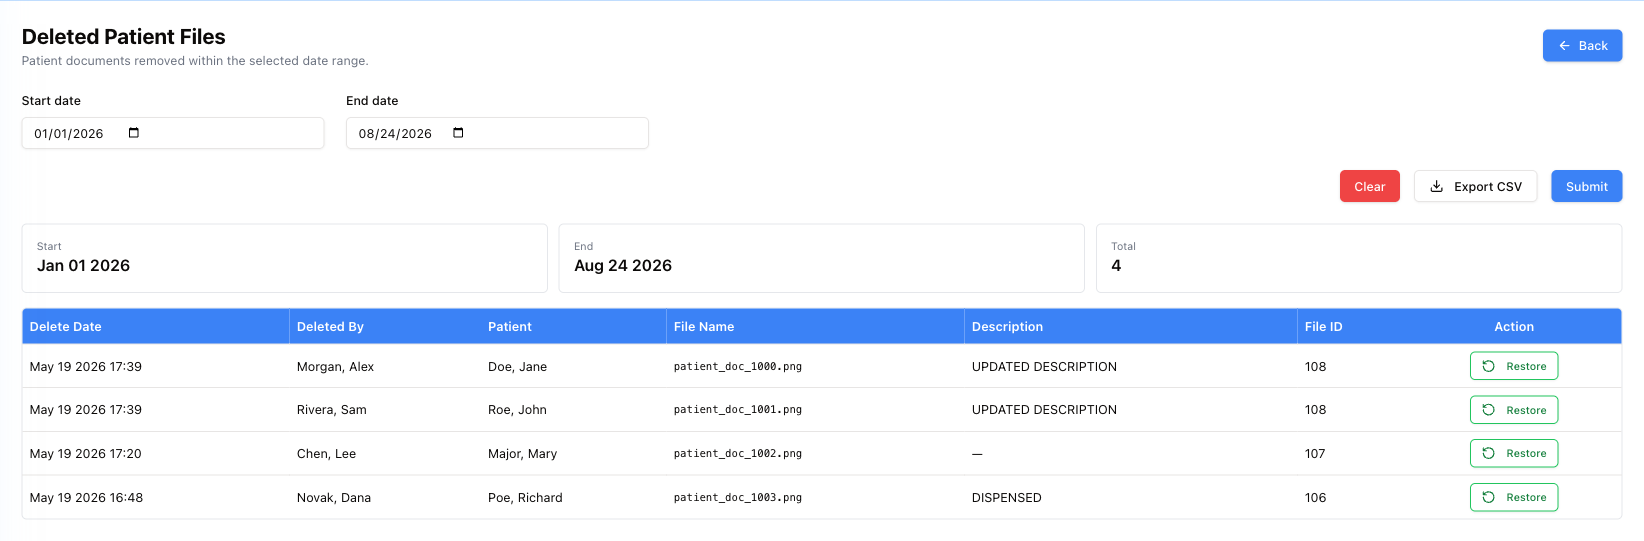
The page is titled Deleted Patient Files: patient documents removed in the period. Columns: the Delete Date, who removed it (Deleted By), the Patient, the File Name, the Description, File on the storage (where the file is actually kept) and the File ID.
And a Restore button. Deleting a patient file does not destroy it — press Restore, you see File restored, and the row disappears from this list because the file is back in the patient's record. Worth knowing before anyone panics about a scan that has vanished.
File Trail
Deleted Files covers patient documents only. File Trail covers every kind of file, and also files that were replaced by a newer upload.
The idea behind it, as the page itself says: files are never removed from the storage. Deleting a file only hides it from the record, and uploading a new one over an old one keeps the old one. File Trail lists every one of those changes with the path where the file still sits, so an administrator can find a file the record no longer shows — for example when it is needed as evidence.
To run it:
- Set Start date and End date (both open on today).
- Optionally pick a Patient — start typing a name in the box ("All files — or search a patient") and choose from the list. Leave it empty for all files.
- Press Submit.
Four cards: Period, Changes, Deleted and Replaced.
| Column | What it shows |
|---|---|
| Date | When the file was hidden or replaced |
| Action | A red Deleted or an orange Replaced badge |
| What | The kind of file — patient document, exam result file, special testing file, SLE or posterior drawing, insurance card front or back, insurance policy file, Rx document or signature, intake form signature, employee signature, vendor agreement, vendor invoice or bill, return-to-vendor or vendor credit document, store or location logo |
| By | Who did it; system if it was done automatically |
| Patient | The patient's name and number — click it to open the patient |
| File name | The original name of the file |
| File on the storage | Where the old file is kept, with a copy button |
| Replaced by | For a replaced file, where the new one is kept (also with a copy button) |
| Record ID | The record's number in the system |
The copy button next to a path puts it on your clipboard (Path copied), ready to send to whoever looks after the storage.
Changes before Oct 7, 2026 are not here, except patient document deletions — the page says so under its title. For older patient documents, Deleted Files has them too.
PHI Access
The page is titled PHI Access Trail — who viewed, printed, exported or changed patient data. PHI is protected health information; this is the report HIPAA asks a practice to be able to produce.
To run it:
- Set Start date and End date (both open on today).
- Optionally narrow it to one Patient and/or one Employee — see Picking a patient or an employee below. Leave either empty for everyone.
- Press Submit.
The typical questions:
- Who has opened this patient's record? — pick the patient, leave Employee empty.
- What has this member of staff been looking at? — pick the employee, leave Patient empty.
Cards show Start, End and Rows (which rows of the result you are looking at, for example 1–500).
One row per request to patient data: Time, Employee, Username, Channel, Method, Path (what was asked for), Patient (name and number), Status, IP and Browser.
The Method badge tells you what kind of access it was: a grey GET is reading — viewing, printing or exporting. A red DELETE is a removal. Any other method (orange) is something saved or changed. A Status shown in red (400 or above) means the request did not go through — for example it was refused for lack of permission.
The report shows 500 rows at a time. When there are more, Prev and Next under the table move through them. Export CSV takes up to 5,000 rows in one file, using the filters on the screen.
Picking a patient or an employee
File Trail and PHI Access no longer ask you to type an ID number. The Patient and Employee filters are search boxes.
Patient:
- Type at least two letters of the first or last name. You can type both names, in either order.
- A list appears with each match's name, date of birth, phone and number (#). It shows up to 30 matches — type more of the name if the person is not there.
- Click the right person (or press Enter to take the first one). The box turns blue and shows the name and number.
- The cross on the right clears it, so the report goes back to all patients.
Employee: click in the box and the staff list drops down, including former employees — for an audit they matter too. It shows the first 50 names, so type part of a name or username to narrow it, click to pick, cross to clear. If you see "You don't have access to the employee list", your account cannot read the staff list — ask a manager to run that part of the report.
Good to know
- Admin reports open on today's date. If you are looking into something from last week, change the dates before Submit or you will get No data.
- Restore only exists for patient documents (Deleted Files). For other kinds of file, File Trail tells you where the file is, but bringing it back is a job for whoever looks after the storage.
- PHI Access CSV uses the filters currently on screen, not the ones from your last Submit. If you changed a filter after running the report, press Submit again before exporting so the file matches what you see.
- Doctor Productivity: if you change the Location after picking a Doctor, check the Doctor is still the one you meant — the list changes with the location.